How To
Distributed Blender Rendering with Xgrid

In January 2004, Apple released Xgrid as a distributed computing solution for use with Macs running OS X. Xgrid uses a Mac interface and Rendezvous networking to provide an easy-to-use solution for cluster computing. Xgrid offers the ability to easily harness the unused resources in Mac OS X environments, including businesses, science and research institutions, educational computer labs, and even wasted computing power when office machines are going unused.
Since Xgrid’s release, many people have been hoping for some method to harness the distributed computing power offered by this technology within their “day-to-day” work. Some of the more frequent questions have been about applying Xgrid to 3D rendering, a natural application for distributed computing because of the processor-intensive nature of 3D software.
Blender is a powerful open-source (and free) 3D application available for many platforms, and used by many professionals and hobbyists around the world. You can read more about Blender in my ATPM review, but please note that since the review was written in January Blender has undergone further development. Blender 2.33a now includes raytracing, ambient occlusion (for global illumination), YafRay integration, and cellular procedural textures—just to name a few of the new features. Because Blender can be easily accessed from the command line, it is well suited for use with Xgrid as a solution for network rendering.
Background
One advantage to Xgrid is its flexibility in harnessing processing resources. The agent computers can be fully dedicated to the cluster, or only join the cluster when free resources are available.
The second option is one of the obvious benefits to the technology. An agent computer might be used as a workstation during the day, but during off-hours (during breaks or at night) the computing resources become available to the grid.
Another advantage to the Xgrid solution is that once the agent is configured to participate in a cluster, no advanced configuration or setup is needed by other users at the agent end to participate in the grid. The grid controller ensures that the proper files are distributed when the task starts.
Unlike some other distributed rendering solutions, Xgrid allows the controller machine to also act as an agent, meaning a grid consisting of only two machines will allow both computers to contribute to processing. This makes Xgrid a great solution for small businesses or hobbyists with Macs who are interested in getting the most from their limited computing resources. Obviously, more computers means more computing power, but only two computers are necessary for performance gains.
Apple provides an overview of Xgrid with the Guide for Xgrid Technology Preview 2 (PDF). This document includes a description of the technology with a working explanation, installation instructions, and basic instructions for creating custom plug-ins.
Xgrid: High Performance Computing for the Rest of Us is an informative article on the Apple Web site. One of the related resources discussed in this article is Xgrid example: Parallel graphics rendering in POVray, by Dr. Daniel Cote. This POVray article provided the information that suggested Xgrid could be used with Blender.
The above resources are suggested reading for a better understanding of the technologies.
This tutorial would not be possible without the help and feedback from the Xgrid Mailing List and specific contributions from Dr. Charles Parnot at Stanford University and James Reynolds at the University of Utah. Many thanks for their help.
Installation
Before using Xgrid (or any distributed computing), your computers must be properly networked. The network may be wired Ethernet or AirPort (wireless), although a faster network connection will result in better Xgrid performance.
Download the Xgrid Technology Preview 2 from the Apple Web site. Installation is simple; just open the disk image and launch the installer. Use the same installer on all computers that will be participating the grid.
Firewall Settings
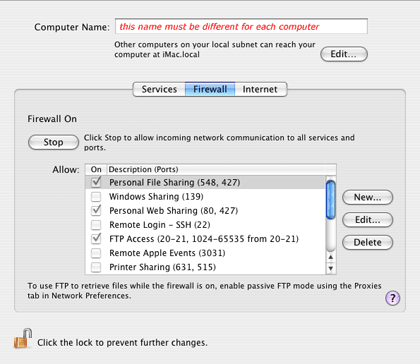
It is important to allow the computing grid to communicate properly over the network. Because OS X’s built-in firewall may prevent communication between Macs in the grid, it is important to adjust the firewall settings.
- Open System Preferences.
- Click on the “Sharing” icon in “Internet & Network.”
- Click on the “Firewall” tab.
- Click on “New.”
-
Add the following settings:
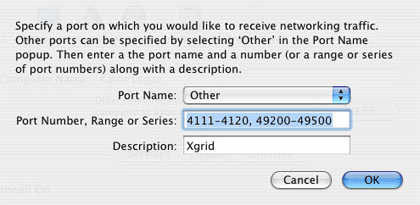
The new Xgrid firewall setting should be added to the preferences of each computer on the grid. The computer may need to be restarted before the changes take effect.
It is also important that computers on the network have unique network names. If two or more computers share the same network name on the network, Xgrid may not be able to properly recognize them. This setting is found near the top of the window in the Sharing Pane.
Note: In some cases, changing the computer’s network name may not be enough. When each computer has a unique network name, but the nodes still aren’t appearing in Xgrid, the cause may be from computers having the same account name. For example: to make things easiest for network access, people may use the same admin account with the same “name” (Andrew Kator), same login (akator), and same password. This allows them to easily access computers over the network will full permissions. In our setup, when the active account names were both “Andrew Kator,” the network node was not recognized by Xgrid even when the computers had unique network names. When one account name was changed from “Andrew Kator” to “iBook” the node appeared. The actual login and password did not need to be changed.
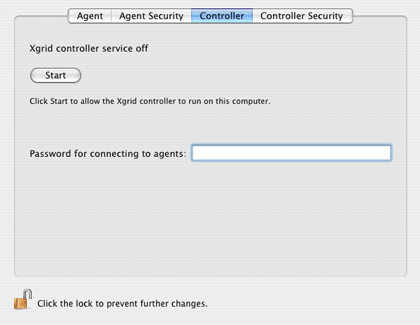
Setup the Controller
Open System Preferences and choose the Xgrid Preferences Pane. Choose the “Controller” tab and click “Start” to allow the computer to administrate and submit jobs to the grid. Only one computer needs to be a controller for Xgrid to work.
Setup the Agents
Setting up Xgrid agents is similar to setting up a controller, except click on the “Agent” tab in the Xgrid preferences. Click “Start” to make the computer to join the cluster.
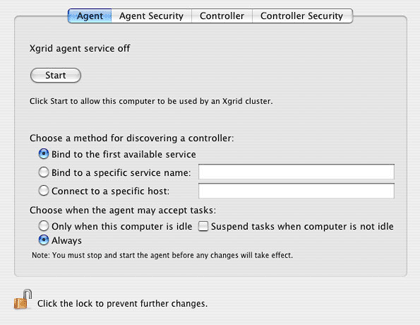
Specific services and hosts (usually the computer name on the network) can be added, but with the options shown above, the agent will automatically find a controller on the local network.
The settings on the bottom dictate how the agent’s processing will be used. “Always” dedicates processing to the grid and is most effective if the computer will not be used for other “normal” work. This setting ensures the most processing power will be available to the grid, but with a performance slowdown if the computer is used for other jobs. If the computer is going to be used for daily work, the other task settings are more appropriate.
The Xgrid Screensaver can be activated in the Desktop pane in System Preferences. The Xgrid Screensaver is not necessary for agents to work, but it does offer visual feedback about when the agent is working with the grid. When the screensaver is running, the computer is dedicated to the cluster. As soon as the mouse is moved and the screensaver turns off, the agent’s tasks are suspended until the computer becomes idle again. This is similar to other distributed computing solutions, such as SETI@Home and Folding@Home.
Testing Xgrid
Now the fun begins! Before configuring Xgrid to work with Blender, it is important to make sure things are running smoothly. In our simple testing setup, we have just two computers: a G4 iMac and a G3 iBook wirelessly networked using AirPort. Because we only have two computers, the iMac will be running as the controller, client, and as an agent. The iBook will only be used as an agent.
To begin harnessing the grid, launch Xgrid in the Applications folder. The computer running the Xgrid application will become the client, in this case the iMac. The following dialog appears, with your options marked in red:
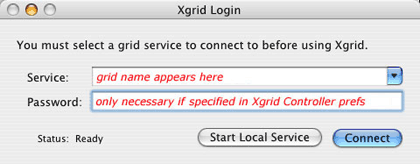
“Start Local Service” is a demonstration mode, and is not for connecting to the grid. Click “Connect” instead. A “New Job” window will appear:
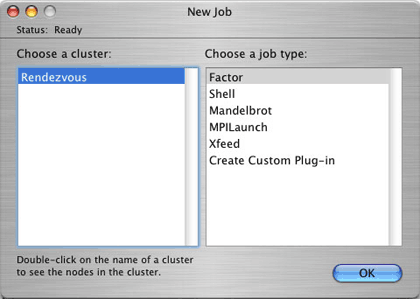
To make sure the cluster nodes are all connected properly, double-click on the cluster name (in this case, “Rendezvous”). If everything is set up properly, the agent computers will be listed.
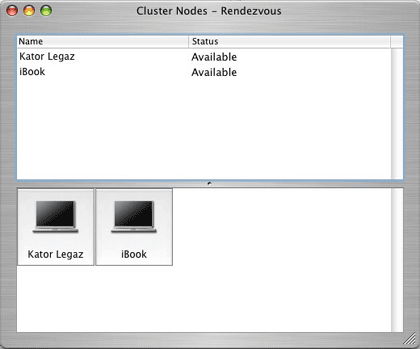
If all grid agents appear, things are set up correctly. If not, retrace your steps, correct the problem, and try again.
Close the “Cluster Nodes” window and choose “Mandelbrot” from the list of jobs. Xgrid will now begin processing a Mandelbrot fractal, with a “tachometer” showing grid performance. Even the basic two-node setup we used for this article showed a 25% performance gain with the cluster compared to using the iMac alone…and that is with a three-year-old iBook over a wireless network!
Now that Xgrid has been tested, we can configure Blender and Xgrid to work together.
Xgrid Custom Plug-in for Blender
On the client computer (the one running the Xgrid application), go to the “New Job” window and select “Create Custom Plug-in.”
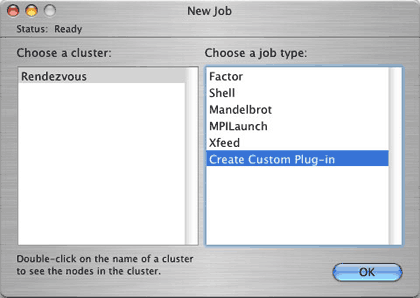
The Custom Plug-in window will appear.
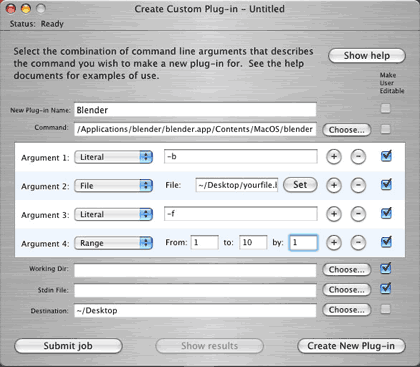
This plug-in specifies how the commands are fed to the computers in the grid. Follow the steps below using the above image as a guide:
| Plug-in Name: | We chose Blender, but you can give the plug-in another name if you want. |
| Command: | Assuming you are like most people and you have the Blender application located within the Applications folder, this line should appear similar to this: /Applications/blender/blender.app/Contents/Mac OS/blender This means, “look in the Applications folder for the folder named blender and look inside the blender.app package for the blender command.” If you have Blender in another location, you must change the path appropriately. If you use the “Choose” button to find the Blender application on your computer, make sure to add /Contents/Mac OS/blender at the end of the path. |
| Argument 1: | LITERAL, -b
This tells Blender to render in the background, without the GUI. |
| Argument 2: | FILE, (where your .blend model is located) It is easiest to use the “Set” button to visually find your file with a dialog box. Make sure your model is set to render still images and not movies. |
| Argument 3: | LITERAL, -f
Render the frame and save it. |
| Argument 4: | RANGE, from (start frame) to (end frame) by 1
This allows Xgrid to automatically instruct the agents which frame to render, moving to the next frame each time a job is finished. |
Click “Create New Plug-in” and the information will be saved. Each time you use Xgrid again, the “Blender” plug-in will appear in the job type list. A new file and a different range of frames can be chosen each time.
It is only necessary to have Blender installed on the client computer (the one running the Xgrid application). Xgrid will distribute only the necessary files and segments of the application to the agents for rendering (it’s a good thing Blender is so small).
More information on Blender’s command line options is available from the Blender Web site. While the Blender GUI allows for “Parts Rendering,” meaning that an image can be split into sections, this feature is not currently available from the command line. Because there is no command-line control of segmenting single frames, the Xgrid rendering solution is currently only useful for animation rendering where whole frames can be individually rendered by agents in the cluster.
Gathering the Output
In theory, the “Destination” option in the Custom Plug-in is where the final rendered images should be saved upon job completion. Unfortunately (at least for Blender), this does not always work.
If your images do not appear in the location specified, the images are saved in the /tmp/
directory on the hard drive of each agent machine. Normally this folder is invisible in Finder windows, so to access it choose the root directory of your hard drive and “Go to folder…” from the Go menu in the Finder. Enter /tmp/
in the dialog, and the directory appears. The images are numbered by frame, so they should be easy to find.
Results and Suggestions
It is important to note that with each render job, Xgrid distributes the necessary files to each agent in the grid. Because this task takes time, it cuts into any rendering speed improvements seen from processing simple or extremely small animations. Using Xgrid to render an animation consisting of only 10 low-resolution frames may not demonstrate significant speed improvements over rendering on a single computer. Slower network connections will also negatively affect Xgrid performance, so expect an AirPort grid to be slower than an AirPort Extreme or Ethernet grid.
With that said, obviously the computers and network used to discover and test the solutions in this article are not optimum for measuring performance—however, with our iMac/iBook/Airport grid we were able to witness a 10-21% decrease in rendering times over using the iMac alone. The models we used for these tests are available for private and educational use.
The performance improvements were most significant when longer, more complicated animations were used. A 21% speed improvement may not seem like much, but when creating animation, any improvement is welcome. These results are even more exciting when we have not spent any additional money, but instead harnessed existing resources that were going untapped. Because of the nature of distributed computing, all Xgrid results are scalable—if we added another G4 or a G5 to the grid, processing power would improve drastically.
For those of us using Blender for animation on Macs, Xgrid offers easy, effective, and reliable distributed rendering. For those without Macs, don’t give up hope—there is discussion that it would not be difficult for other platforms to use Xgrid networks. Because Xgrid is based on open-source technology, it is possible that someone (maybe even Apple) will write software to include other platforms.
There is no reason why similar Xgrid solutions cannot be applied to other software that has command line access. The Custom Plug-in settings will be different for other applications, so it is important to research the software documentation for specific solutions.
![]() Copyright © 2004 Andrew Kator,
akator@atpm.com.
Copyright © 2004 Andrew Kator,
akator@atpm.com.
Also in This Series
- Give Alert Sounds a Little Personality · March 2012
- Create Your Own iPhone Ringtones · February 2012
- Create Your Own Homemade Audio Book · December 2011
- Upgrade to Lion Painlessly · August 2011
- Make the Most of TextEdit · July 2011
- Using the Free Disk Utility on Your Mac · May 2011
- Making Use of QuickTime X · March 2011
- Making the Most of What’s Already on Your Mac · February 2011
- Making the Most of What’s Already on Your Mac · January 2011
- Complete Archive
Reader Comments (7)
Also it does help if in blender you _don't_ specify a folder to render to, the rendered file will then either be placed in the root of your hard disk, or in a folder at the same place where your .blend comes from
http://download.blender.org/documentation/html/a19823.html
I am using Intel P4 1.8 (RAM:256) and Blender 2.37a
Rendering is taking too much time. Almost 3 Minutes per
frame.
If I buy a iMac G5, will my problem be solved.
KK Rawal
No single computer is going to solve your problem. If you really want to decrease animation rendering times, you need a distributed computing solution that uses multiple computers. You can pay companies with render farms to do this for you, or you can build your own.
Currently I have a PowerMac dual G4 1ghz tower with 1GB Ram and OS X Server 10.4 and recently purchased four Mac Mini's for full time rendering agents for Blender at home. My iBook (700Mhz G3) is also a part time agent as well.
I have an old compaq K6-2 400 with 96MB of ram that I am considering wiping clean and installing FreeBSD and downloading the Xgrid agent for FreeBSD i386 from Sourceforge to see if that could work with the system as well.
At the very least, I am going to set that box up with a 40GB HDD and use it as a file server to see if I specify a network drive location in Blender and see if Xgrid will automatically deposit all the frames to a specificed location.
I also have a copy of FCP 4, so I can import a sequence of images and encode to a Quicktime movie without much hassle.
Thanks for the Basic tutorial. Helped a lot with getting the basics set up.
Since there is no Xgrid in the Applications folder?
Or is it only possible through the command lines?
What is the command line?
Thx I am new to this Xgrid but I've found out that the Xgrid Application is no longer in 10.4 how do I get a GUI or somehow create jobs?
I have a grid, I have Blender, But no way to create a job and sbmitt it in the Cluster.
Pls Help
Since OS X 10.4 was released in May 2005, the Xgrid controller requires OS X 10.4 Server. This is separate software that you can purchase from the Apple website.
If you want to hack Xgrid to use it without OS X Server 10.4, it is possible but not productive. You will not gain any productivity by hacking, since each rendering job will take a long time to hack, troubleshoot, and correct.
We chose not to use Xgrid and developed our own system, so we haven't used Xgrid since June 2005.
Xgrid uses open source technology, and can be duplicated with the knowledge, desire, and abilities.
Hint: BEEP
What you need to do is download the Apple Xcode developers tools. You are going to need Xcode to compile programs.
Also download the OSX server utilities. This provides Xgrid Admin. Those are all freebies if you poke around Apple's site.
Next step is google and find a copy of Xgrid light. This is an easy to use GUI interface to access the controller features built into every distro of Xgrid whether your on OS 10.4 or 10.4-server. In the past six months, Xgridlite is now been GPLed. Again, you're going to need Xcode to compile and run the application.
Finally, in the Xcode developer's examples, there is a folder with Xgrid examples. One of those examples is the feeder application that gives you the nice GUI interface. Now if I can figured out how to get it to make a nice .app, I'd place it on BlenderXgrid.com for everyone.
Conversely I went about and created a webbased form that one could upload a .blend file and then a PERL script passes the command off to the shell. Never got around to actually testing that yet because of security concerns.
Add A Comment