How To
Create Your Own Homemade Audio Book
Anyone paid attention to some of the new car ads lately? I don’t know exactly when it happened, but the ads stopped focusing on traditional selling points like fuel mileage, horsepower, or legroom, and started focusing on connectivity. Everyone, it seems, wants us to know how easy it is to access your entertainment from their auto.
That transition was inevitable given the amount of time most people spend in their cars these days. The car stereo has been around for a while, and with the advent of CDs, and later MP3 players, it’s no surprise that audiobooks became popular. Who wouldn’t want to put some of that commuting time to good use with a little light reading?
Cupertino to the Rescue
I’ve always had mixed feelings about reading text in audiobooks or other digital formats. On the positive side, with an iPad I can store hundreds of books in the space that was occupied by one traditional hardcover. Unfortunately, until relatively recently, there has been one major drawback: consumers had to depend upon someone else to create the content. If your needs for creating audiobooks are modest, Cupertino may have come to your rescue. It wasn’t exactly easy for end users to take documents they created and turn them into audiobooks. In fact, if you’re reading this issue on a Mac, you probably already have all the necessary tools.
A few months ago, almost as an afterthought, in an article about the benefits of TextEdit I mentioned the prospect of creating your own spoken word audiobooks using TextEdit. Let’s be clear here: we’re not talking about ripping existing audiobooks but rather converting documents you’ve created, or have legitimate access to, into audio files that can be played on your portable device or in your vehicle. For this project, we’ll make use of TextEdit to open the documents and your Mac’s text-to-speech features to create the audio files. iTunes will, of course, handle transferring the audio file to your device, and Automator will handle the process with as little human intervention as possible.
Apple at Your Service
My first efforts at creating my own audiobooks from text files did not go as smoothly as I would have liked. In researching potential solutions, I discovered that in Mac OS X 10.6 and later Apple has already provided one solution to the problem. It’s not perfect, more on that on a moment, but it works. In an effort to have this function available when you need it and out of the way when you don’t, it’s been placed in Services and hiding under the name “Add to iTunes as a Spoken Track.” Like other services, this one is contextual; it only appears if some text is selected.
The “Add to iTunes as a Spoken Track” service was built using Automator, so we can modify it to suit our needs. Go to the root level of your hard drive and open the /System/Library/Services folder. Drag the Add to iTunes as a Spoken Track file onto your Automator icon, and it will open. Let’s examine what’s being done and what we might want to change.
The first thing you’ll notice in the pane at the far right of the window is that this service is set to accept text from any application. Take a moment to examine this set of pop-up menus if you like. This is what controls the contextual nature of services. The settings tell the service which applications to appear in and which types of data to accept. With the current settings this service accepts text from any applications. This means that the text which will be turned into an audiobook could come from PDFs, Web pages, or just about any other source. No need to change these settings. They’re most useful just as they are.
The rightmost pane also contains the three steps that make up the heart of this workflow. If your screen doesn’t show the expanded view of this workflow, click the small triangle on the top left of each step. This will expose the settings for each step allowing us to make adjustments.
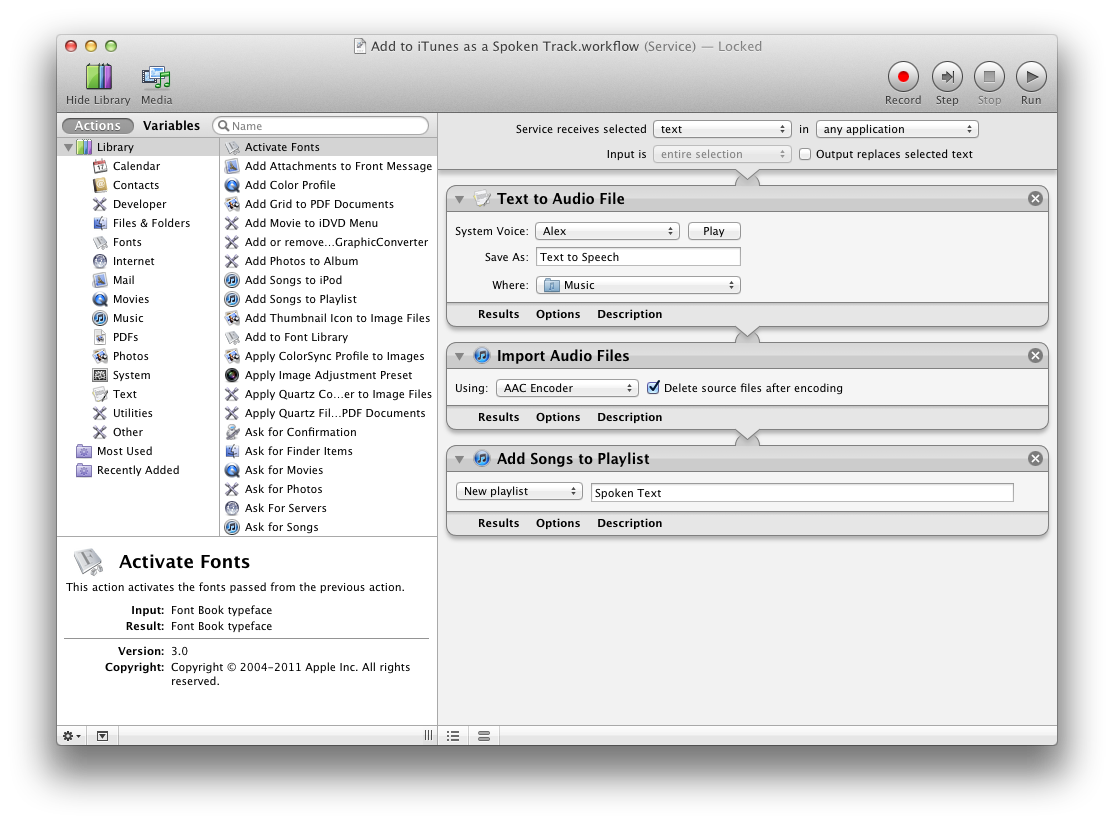
Expanded View of Workflow
Let’s look at each of the steps in a bit more detail.
- The Text to Audio File step sets basic parameters for the completed audio file. The System Voice pop-up allows you to decide which voice will be used to read files to you. Choose a voice from the pop-up and click “Play” to hear a sample. Choices will vary depending upon which voices are installed on your system. The save location is already preset for your iTunes Music folder so there’s no need to change that unless you want the files stored elsewhere.
- The Import Audio Files step decides which type of file will be created. By default, the service uses the AAC format but AIFF, Apple Lossless, MP3, and WAV files could also be created. AIFF and WAV are probably compatible with the most devices but also produce the largest file sizes. MP3 files are a good choice if you do not need to bookmark the file and return to a specific point once it has started playing. AAC files provide some ability to be bookmarked and offer somewhat smaller file sizes.
- The final step, “Add Songs to Playlist,” adds the newly created files to a playlist in iTunes. The default is to create a playlist called “Spoken Text,” but the name of the playlist can be changed. The pop-up menu also allows you to direct the files to an existing playlist.
Once you have made any changes and saved the workflow, we can move on to run the service. It is simple but does require a small amount of intervention on your part.
Creating Your First Audiobook
Now that we’ve come this far, let’s create your first book and hear the results. Open a document which contains some text that you want to hear read aloud. Select some or all of the text in the document. Now choose Services and select “Add to iTunes as a Spoken Track.” The Services menu is found in the application menu (to the right of the Apple menu). You’ll know the task is completed when iTunes makes the same beep it does when an audio CD has finished importing.
The time needed to complete creation of your audio masterpiece varies somewhat. It seems to depend primarily on how much text is being selected and converted. A draft of this article took less than two minutes, while conversion of a typical issue of this magazine took around four minutes on my 2008 MacBook Pro.
Potential
There are a few things about this procedure that I don’t like but haven’t found reliable workarounds for yet. Some are more annoying than others. Here are some things I have discovered that might help you.
- This service will take text from any application and attempt to turn it into an audio file. The problem is that Web pages often contain quite a bit of ads and other text you may not need or want to hear. If you are using Safari 5.1, look in the right hand corner of the address bar and see if the word Reader appears. If so, click that before selecting the text you want to convert. For sites that offer both screen and print versions of their content, try both and see which you prefer.
- Using “Select All” is convenient for selecting text quickly but can produce some unwanted results. Select the ATPM cover page, for example, and the resulting audio file will contain just about everything on that page including all of the staff names.
- As it’s currently constructed, this solution requires user intervention to both select the text and name the audio file. This is a minor inconvenience for some users but might be a significant issue for our readers who have impaired vision.
- It may be possible to remove even more extraneous text before doing the conversion. I’ve seen a few scripts that may fix some of these issues, but I’m still testing those. I’ll keep you posted.
- Try a test file or two first. If you find that the text is not being read at an appropriate pace, go to the Speech preference pane, select the voice you are using to read your text, and adjust the rate until it is more to your liking.
- Once your file has been imported into iTunes, you can be sure that iTunes will remember where the file stopped playing. To make iTunes pick up where it left off select the new “audiobook” in iTunes and press Command-I to bring up the “Get Info” window. From there, go to the Options tab and choose “Remember Playback Position.”
Final Thoughts
I started this article a few months ago when a reader asked if we had ever considered doing a podcast. Given how busy our volunteer staff is this may have to be a tentative step toward an alternative. It’s far from perfect, but it’s also gotten me to take a look at the whole e-books issue. There are some tools out there for that as well, but I’ve only scratched the surface there. Look for more on that in the future as well.
![]() Copyright © 2011 Sylvester Roque, sroque@atpm.com.
Copyright © 2011 Sylvester Roque, sroque@atpm.com.
Also in This Series
- Give Alert Sounds a Little Personality · March 2012
- Create Your Own iPhone Ringtones · February 2012
- Create Your Own Homemade Audio Book · December 2011
- Upgrade to Lion Painlessly · August 2011
- Make the Most of TextEdit · July 2011
- Using the Free Disk Utility on Your Mac · May 2011
- Making Use of QuickTime X · March 2011
- Making the Most of What’s Already on Your Mac · February 2011
- Making the Most of What’s Already on Your Mac · January 2011
- Complete Archive
Reader Comments (0)
Add A Comment