How To
Using the Free Disk Utility on Your Mac
OK. I admit it. In my early days as a Mac user, I was a little jealous of my PC-using buddies. After all, their machines came with so much pre-installed software. Our Macs seemed to have very little free or demo software by comparison. Even the software that was present never seemed to be very useful for me.
When I bought the initial release of Mac OS X, I noticed something interesting: since it was a major shift in the OS there seemed to be even less in the way of free software included, but what was there was actually useful. That trend has continued over the years with more and more potentially useful applications included with each new Mac. That shift from almost useless software to often useful software has been the reason for this series of articles. This month we take a peek inside the Utilities folder and examine Disk Utility.
A Tinkerer’s Toolbox
I’ve always tinkered with the configurations of our Macs in ways that I’ve never been comfortable doing with Windows-based machines. That’s part of the reason my wife and I have different computers: She’s never sure when one of my experiments won’t backfire horribly. Unfortunately, they have on several occasions. Apple builds some remarkable machines, but try as they might the engineers can’t seem to protect me from myself. Over the years I’ve relied on various incarnations of Norton Utilities for Macintosh, DiskWarrior, and Drive Genius just to name a few. In fact, I reviewed Drive Genius 2 for ATPM some time ago.
Although Norton Utilities for the Macintosh has long since ceased to exist as a viable utility, I have current versions of the latter programs on my hard drive. I bought, and used, them because the Apple disk utilities included in the System 7 days just didn’t seem to get the job done as efficiently. Sometimes they didn’t get the job done at all. As recent incarnations of Mac OS X’s Disk Utility have improved, I have relied on it more often and third-party utilities less often.
Why Use Disk Utility
If there are good third-party utilities available, why use Disk Utility? I must admit that I started using Disk Utility out of necessity. As is often the case, a major OS upgrade brought changes that meant several utilities needed to be upgraded. Using older utilities on a new version of the operating system is not just a matter of hurting system performance—it’s asking for trouble. Utilities that are not aware of important changes can wreck your system installation. When you upgrade your OS, make sure your favorite utilities have been tested with the new OS before using them. You have been warned.
That’s the first instance where Disk Utility shines. A new version of Disk Utility will be included free on any upgrade disc that you purchase. It will be aware of important file system changes. While you’re waiting for developers to release new versions of their software, or in my case to save the money for the new software, Disk Utility can be your best friend.
In addition to being included free with your new Mac, Disk Utility is pretty simple to use for most tasks. Not all utilities can make this claim. Normally I don’t mind a little complexity or confusion, but in a disk utility unnecessary complexity can lead to mistakes—and data loss.
What Can I Do With It?
Disk Utility is a more versatile program than its somewhat spartan interface would suggest. I won’t cover everything that the program does in this How To, but I will get to the things that I think you are going to find most important. Let’s go through each tab step-by-step and look at some of my most used functions:
Verifying S.M.A.R.T. Status
Most modern hard drives offer some level of Self-Monitoring and Reporting Technology in an effort to detect potential hard drive problems and report them to the user before a drive failure. Disk Utility does not provide as much information about a drive’s S.M.A.R.T. status as some other utilities, but it does show overall status.
Checking S.M.A.R.T. status with Disk Utility is easy. Launch the program and select a drive from the list in the left pane. Now look at the lower right corner of the Disk Utility window. If the status shows as verified, the drive is reporting that the parameters being examined are OK. Ideally, you want to see a drive that is functioning properly.
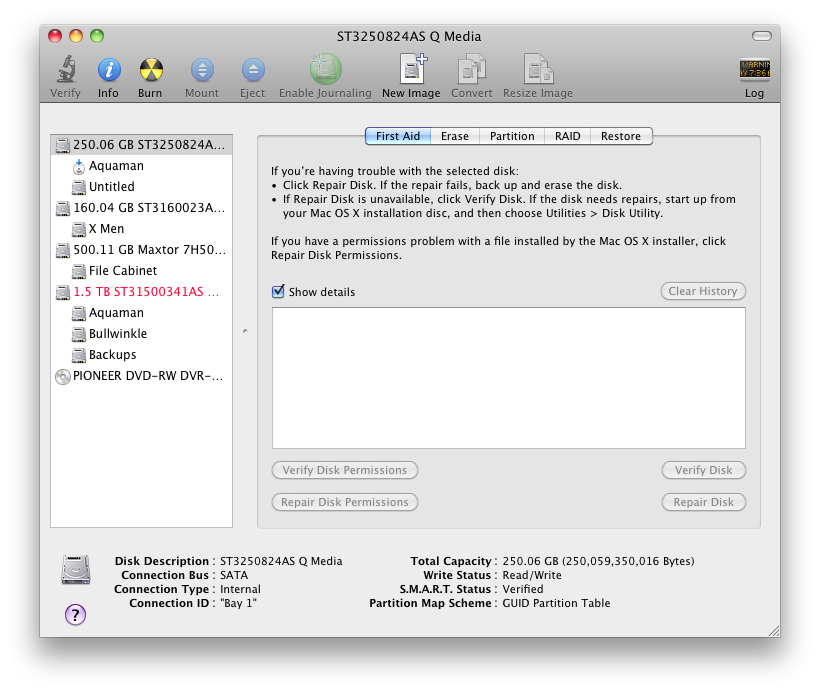
S.M.A.R.T. Status Verified
If you see the failing drive indicator, get your data backed up quickly. The drive may not fail right this moment, but I wouldn’t trust it for long. The name of the failing drive appears in red in the list on the left of the screen.
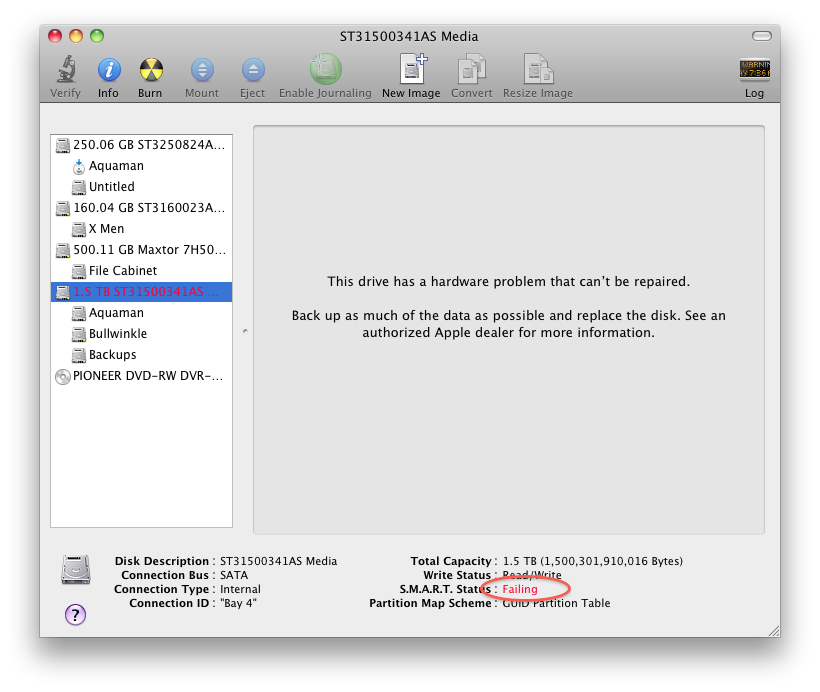
Potentially Failing Drive
Useful Tip: I currently have a drive that is failing Disk Utility’s S.M.A.R.T. test. As a result, I discovered that Disk Utility shows the model number of all directly attached drives in its list on the left side of the window. If a drive is failing, its model number appears in red. On Mac Pro systems, which have more than one drive bay, Disk Utility will also show you which drive bay contains the failing drive. Look for the “Connection ID” in the lower left corner of the screen.
Performing a Little First Aid
Hardware problems are not the only thing that can lead to loss or corruption of data. Over time, hard drives can develop a variety of directory structure errors that make data retrieval almost impossible. Imagine going to a sporting event with your buddy. You go to the concession stand in search of refreshment knowing that your friend is sitting in Section C, Row 1, Seat 27. While you are gone, someone paints over the markers. Try finding your friend now among all those people.
Computers have similar problems finding things when a hard drive’s directory structure is damaged. Fortunately, Disk Utility can fix many of these errors. To run this test, simply select a drive from the list on the left and click the First Aid tab.

The First Aid Tab
From there you can choose either Verify Disk to check for errors or Repair Disk to fix any errors that are found. The other two buttons in this window fix or repair file permissions errors respectively.
If you have selected a drive and these buttons remain grayed out, it usually means that you are attempting to repair your boot drive. Many repairs on your boot drive must be performed from the Mac OS X DVD or from a backup of the boot drive.
Anyone Got an Eraser?
The Erase tab contains functions that do exactly what the name implies—erase data from your hard drive. Select the target drive from the list at the left and choose the drive format from the Format pop-up menu. If you will be using the drive exclusively with a Mac, use the Format pop-up to choose one of the variations of Mac OS Extended.
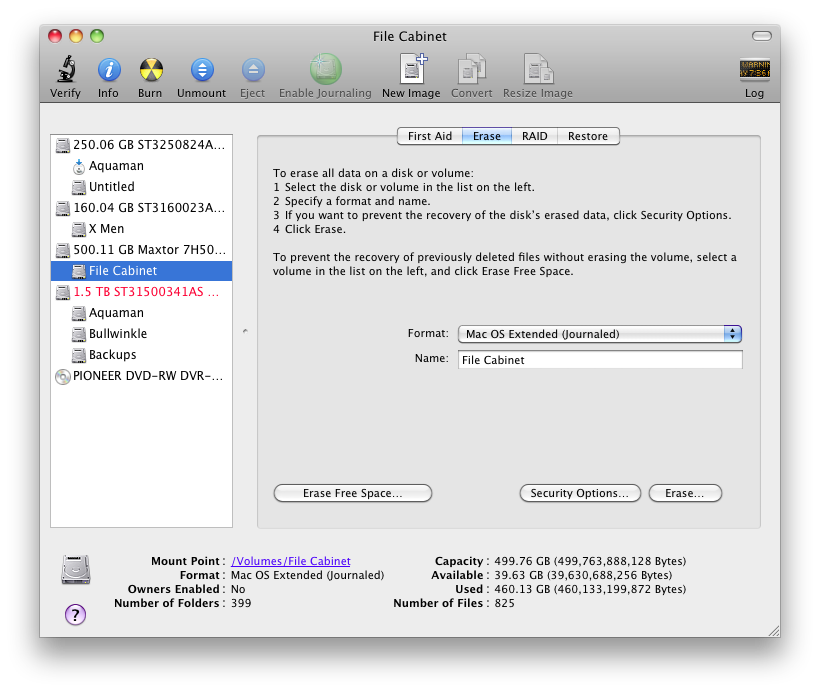
The Erase Tab
The journaled options allow saving of some additional information on the drive that may assist recovery of directory problems. You can find additional information about journaling and its benefits here. If you need to format the drive for use with both Mac and Windows, FAT is an option though it limits individual files to less than 4 GB each.
Clicking the Security Options button controls how data will be erased on the target hard drive. “Don’t Erase Data” is the default option and quickest because it leaves the data behind, erasing only the catalog information that Mac OS X uses to find the data. When drives are erased this way, recovery utilities may be able to recover the data unless it has been overwritten by new data.
Each of the other options takes longer and offers increasing levels of security. In addition to erasing the catalog information, zeros are written over the existing data. The choices offered provide for 1, 7, or 35 passes of zeros. The more passes the less likely it is that data recovery software will find any files. The 7- and 35-pass options can take quite some time.
Partitioning
I don’t partition my drives as often as I used to. When you think about it that seems odd given how much drive capacities have increased. The controls for this tab are for the most part self-explanatory. It’s possible to chose the volume scheme (number of partitions), name each partition, and set its size.
If you have partitioned a drive and later find that you need to enlarge a specific partition, Disk Utility may be able to help with a little preparation. First, back up any data on the drive that you will be changing. Pay particular attention to the partition you will be enlarging/shrinking and the following partition.
Second, follow these directions.
Ready for a RAID
Although I have not used it for this purpose, Disk Utility can harness several disk drives into a RAID array. Creating RAID sets permits users to either protect against the possibility of data loss due to hardware failure or speed up access to data. If protecting your data is your top priority, consider creating a mirrored RAID. Perhaps I’ll have a bit more information about the pros and cons of RAID arrangements in a future article.
Restoring Data
Being someone who likes to tinker with Macs, I try to keep a current “clone” of my boot drives around. In an emergency, such as a failure of the boot drive, it’s possible to boot from a clone and restore things. I wrote about cloning way back in October 2002. The tools mentioned in that article are somewhat outdated, but the basic principles and benefits remain the same.
Although my current cloning tools of choice are SuperDuper and Carbon Copy Cloner, it’s possible to clone your drive using Disk Utility. The process is actually quite simple:
Select the Drive That Will Contain Your Clone
When cloning your boot drive, you will need a drive that is at least as large as your boot drive. If you have partitioned your boot drive, it is possible to have the “clone” reside on another partition, assuming the partition is large enough. As a general rule, I don’t recommend that, though. Using a partition to hold your clone presents one major problem: if the drive fails, you may not only lose your boot drive but the clone as well. I prefer using an external drive for any clones I make. If you are using a drive which already contains data, make sure you have taken steps to save the data before you begin the cloning process.
Connect the Drive That Will Hold Your Clone
Current Mac models will boot from internal drives or external drives (FireWire, or USB). USB is generally a bit slower than the other protocols, but it will work. Some PowerPC Macs will not boot from an external USB drive, so check the specifics for your Mac.
Launch Disk Utility and Select a Drive
Once you’ve selected a drive from the list at the left click, the “Restore” tab. Select your boot drive from the list on the left and drag it to the blank space marked Source. Drag the drive that will contain your clone from the list on the left to the pane marked Destination. When everything is set up, your Restore tab will resemble the screenshot.
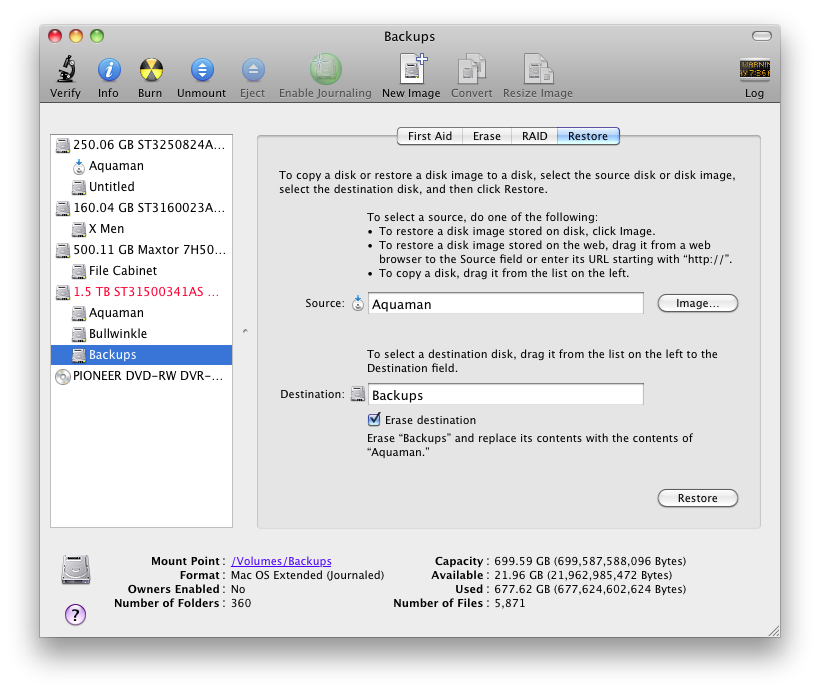
Completed Restore Tab
It’s important to make sure that you have your source and destination drives designated correctly. When the “Erase destination” option is checked, all information on the destination drive is erased before the copying process begins. Once you have set this option, you’re ready to begin the cloning process by clicking Restore.
Disk Utility is not as versatile as other cloning utilities I use. It can’t, for example, perform an incremental update to your clone. Each time you run a restore it’s an “all or nothing” process. It will, however, get the job done until you find your favorite utility.
Final Thought
Unlike some of its predecessors, the current incarnation of Disk Utility easily meets the criteria for inclusion as one of the useful applications included with current Macs. It has a few other tricks up its sleeve, as well, including burning discs and creating disk images. Personally, I find its process of creating disc images a bit cumbersome. As I result, I don’t use that feature often. If this is something you need to do regularly, I suggest DropDMG (developed by ATPM publisher Michael Tsai) as an alternative. Until next time the lab is closed.
![]() Copyright © 2011 Sylvester Roque, sroque@atpm.com.
Copyright © 2011 Sylvester Roque, sroque@atpm.com.
Also in This Series
- Give Alert Sounds a Little Personality · March 2012
- Create Your Own iPhone Ringtones · February 2012
- Create Your Own Homemade Audio Book · December 2011
- Upgrade to Lion Painlessly · August 2011
- Make the Most of TextEdit · July 2011
- Using the Free Disk Utility on Your Mac · May 2011
- Making Use of QuickTime X · March 2011
- Making the Most of What’s Already on Your Mac · February 2011
- Making the Most of What’s Already on Your Mac · January 2011
- Complete Archive
Reader Comments (0)
Add A Comment