How To
Create Your Own iPhone Ringtones
In the summer of 2010, I parted with my old Palm phone and entered the fraternity of iPhone owners. I could have waited to see if other carriers got the iPhone—which they did mere months later—before making the leap, but the Centro phone no longer played nice with my Mac. Each attempt to sync calendars and contacts was a laborious, time-consuming ordeal.
Normally, when I buy a new electronic toy I dive right in, push every button, and try every feature. I didn’t do that with the iPhone 3GS. I’ve never been one to use a lot of data or multimedia on my phone. It’s nice to have the option to do so, though. Until recently I hadn’t even bothered to investigate how to create custom ringtones on my phone. It’s not that I expected creating ringtones to be difficult but that it was just a low priority for me.
Why the Sudden Interest in Ringtones?
I’ve only had four or five different cell phones since the mid-nineties, and none of them have made it especially difficult to add new ringtones. In spite of that, I haven’t felt the need to add new sounds. So, given my less than burning desire for new ringtones, why investigate that now?
Recently, over a period of several days I seemed to run across an unusual number of forum threads similar to this one, asking what was needed to create custom ringtones. The answers often included links to sites where ringtones could be purchased or links to third-party software such as iPhone Ringtone Creator or YouTones. Personally, I’ve got nothing against either method of getting custom ringtones, but this seems to fit right in with our ongoing theme of investigating existing Mac software when starting a project before purchasing new third-party software. This process, while not uniquely mine, is easy enough that anyone can do it. Let’s open the lab and get right to work.
Gather Your Tools
You don’t need any special tools for this project. Essentially we’re taking a portion of a sound file on your Mac and converting it to a format that the iPhone recognizes as a ringtone. In fact, all you really need are:
- A few sound files that you want to convert to ringtones. I’ll be using files from my existing iTunes library, but you can add any sound iTunes can play properly. These directions were written with DRM-free sounds in mind. If you’re going to be working with iTunes Music Store files that still contain DRM, give these directions a try.
- iTunes (or other software capable of creating AAC files).
- An iPhone. I used my iPhone 3GS for this experiment, but I have seen reports that this process works with older iPhones as well.
If you would like to have more precise control over the final sound than iTunes provides, GarageBand will do the trick. In fact, any sound editor capable of saving files in AAC format, including many free ones, should do nicely.
Now that we have the right tools, let’s get down to work. We’ll start by creating a new folder that we can drag the new ringtones into. Unless you choose to delete the folder later, you’ll only have to do this once. Creating this folder gives us a convenient place to store the new ringtones until we are ready to import them. I placed my folder on the desktop, but it could be anywhere.
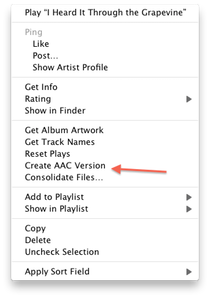
Before we create any new sounds, let’s make sure iTunes is configured properly. Launch iTunes and go to the Music section of your library. Right-click a song that’s DRM-free. When the contextual menu appears, examine the listed options. If one of them says “Create AAC version,” you’re ready to start. Some versions of iTunes have “Convert Selection to AAC” listed. The exact wording isn’t important as long as iTunes is converting sounds to AAC format. If you already have one of these options listed, feel free skip the next paragraph.
Creating AAC Sounds
The conversion option listed in the contextual menu depends upon your chosen format for importing music. Making the format change is simple. From the iTunes Preferences window, click the General tab. Near the bottom of the window is a button called Import Settings.
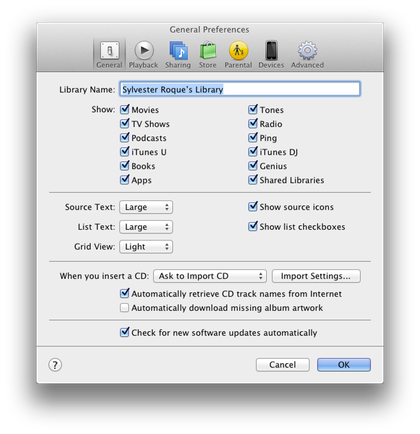
Where to Change Encoder Settings
Click here and wait for the next window to appear. In some versions of iTunes, this option is found in the Advanced tab and listed as “Import Using.” In either case, change the Import Using pop-up menu to “AAC Encoder.”
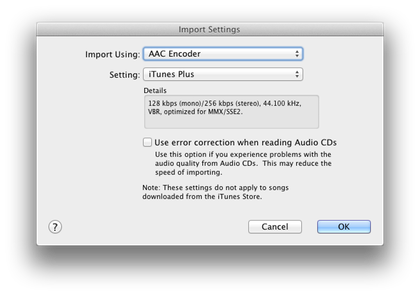
Encoder Changed to AAC
This setting can be reverted to your chosen format when we’ve finished creating your new ringtones.
Creating Your First Ringtone
Select the sound that you want to use as the new ringtone. You must keep your ringtones to 30 seconds or less. In iTunes, snipping that much time out of a song is simple. Start playing a song and wait for it to reach the beginning of the segment of sound that you want to use. Make note of that time, as it’s shown in iTunes. Let the sound play until you reach the end of the segment you want to use and note that time. Now do the following:
Right-click your chosen song and chose Get Info. In the next window, click the Options tab and place check marks by the checkboxes for the start and stop times. Enter the times you noted earlier in these boxes. Changing the volume and equalizer settings shouldn’t pose a problem.
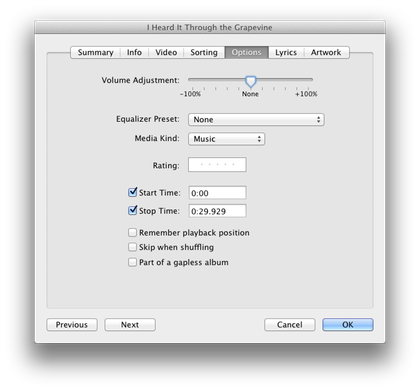
Completed Options Tab
Click OK and iTunes will use the sound segment that you just marked to create the ringtone. Don’t worry; the conversion process creates a new file rather than altering the original.
Right-click the sound/song again and choose “Create AAC version.” iTunes will beep when the conversion is completed. Now you can right-click your original file, go back to the Options tab, and clear the start and stop time checkboxes.
Once that is finished, we need to locate the new sound inside your iTunes Music folder. In recent versions of iTunes, you can do this easily by right-clicking the original song you are working on and choosing “Reveal In Finder.” This takes you directly to the appropriate folder. The new sound is usually right next to the original file.
Drag your new song file from its current folder to the temporary folder you created earlier. If you have difficulty identifying the new song, look at the filenames. The shortened file that will be your ringtone usually has a number at the end of the filename just before the extension (e.g. sound1.m4a). Quick Look can also be a useful tool here as well. It’s an easy way to see the file durations and sizes if needed. Change the extension of these files from .m4a to .m4r. The Finder will ask which extension you want to use. Make sure you choose .m4r.
At this point, we are almost done with the project. Go back into iTunes and select the shortened AAC files that you created. It’s safe to delete those now. It not absolutely necessary to remove them, but all they are really doing is cluttering up the library. If you have trouble finding the right files, go to the View menu in iTunes and select View Options. Click on the “Kind” and “Date Added” checkboxes and click OK. These columns now appear in your library. Clicking the “Date Added” heading will sort the library based upon when the files were added. The “Kind” column can be a failsafe to make sure you are deleting the correct file.
While we are still in iTunes, go to the File menu and choose “Add To Library.” Navigate to the temporary folder where you stored the ringtones and let iTunes add them to the library. If you are only adding one new ringtone at a time, try simply double-clicking the .m4r file you created. It will be added to the library automatically. All that is left to do now is sync your iPhone so the ringtones will transfer.
Final Thoughts
I don’t have a means of testing this at the moment, but I believe a similar process might work with other smartphones. This assumes that you know what file format and length of sound the phone expects. I am starting to wonder if it would be possible to do other things such as create new alarm sounds for iCal, but that’s a project for another day. Maybe next time. Until then, the lab is closed.
![]() Copyright © 2012 Sylvester Roque, sroque@atpm.com.
Copyright © 2012 Sylvester Roque, sroque@atpm.com.
Also in This Series
- Give Alert Sounds a Little Personality · March 2012
- Create Your Own iPhone Ringtones · February 2012
- Create Your Own Homemade Audio Book · December 2011
- Upgrade to Lion Painlessly · August 2011
- Make the Most of TextEdit · July 2011
- Using the Free Disk Utility on Your Mac · May 2011
- Making Use of QuickTime X · March 2011
- Making the Most of What’s Already on Your Mac · February 2011
- Making the Most of What’s Already on Your Mac · January 2011
- Complete Archive
Reader Comments (0)
Add A Comment