| Mac File Sharing |
| Transferring files with your Mac's built-in software |
| Mac-to-PC Sharing |
| Products that allow Macs to swap files with PCs and vice versa |
| FTP File Transfer |
| Setting up an FTP server for Mac or PC file sharing |
| File Backup |
| Using a network to back up your files |
File sharing is the ability to let other computers on a network view the files on your computer. Of course, you control who can open or modify what; your Mac has specific pieces of software that exercise this control, known collectively as Mac File Sharing.
Sharing files to the network
This section helps make your Mac's files accessible to the network. If you just want to connect to existing shared files, skip ahead to the Accessing Shared Files section.
In the Apple Menu, check the Control Panels submenu for File Sharing and open it (for System 7 users, open Sharing Setup instead).

This control panel has the basics of file sharing, the owner name (an account name for you, the owner), the owner password, and the computer name (on a network, each computer has a different name to distinguish itself; set that name here). Then Start File Sharing, if it's not already running. This may take a minute while your Mac notifies the other Macs on the network that it's ready to share files.
Now select the Users & Groups tab (for System 7.x users, open the Users & Groups control panel).
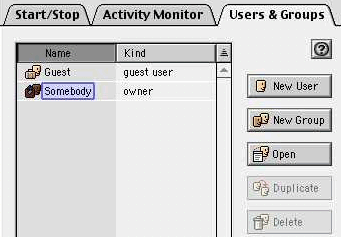
 Here's the System 7.x Users & Groups control panel. The New
User and New Group commands are in the File menu, as opposed
to the Mac OS 8 & 9 buttons shown above. The owner icon has a thick
border to distinguish its icon from other users.
Here's the System 7.x Users & Groups control panel. The New
User and New Group commands are in the File menu, as opposed
to the Mac OS 8 & 9 buttons shown above. The owner icon has a thick
border to distinguish its icon from other users.The Guest user is anyone who accesses your files without a name and password. Open the Guest account to allow or prevent such access. If you prevent it, only people with a specific User account can access your files. Choose New User to add a user account, and New Group to add a group account. Groups save time by controlling access for several users at once. Drag a user icon onto the group icon to add it to that group.
Sharing a disk or folder of files
On the Desktop, click once on a disk or folder you want to share. Then select Sharing from the File menu's Get Info submenu to bring up the sharing access window. (System 7 and Mac OS 8 users select Sharing from the File menu, as there is no Get Info submenu.)
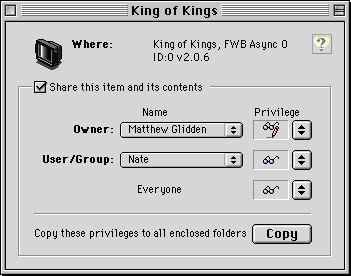
This window permits or denies access to your shared files when users connect from another Mac on the network. Read-only means users can see, open, and copy files, but make no changes. Read & Write means they can also change the contents of your shared files. Everyone refers to the Guest account, if you allow Guest access. The Copy button will make all subfolders like the enclosing folder, resetting any specific access changes you've previously made.
Typical file sharing setup
For home networks, you'll allow Guest access and give them read and write access, since you know everyone who'll be connecting to your files. In professional situations, you'll need to be more circumspect, probably creating user accounts for each worker and denying Guest access.
Accessing shared files
Setting up your shared files (what you just did) takes a bit of work, but it's typically a one-time thing. Accessing shared files from the network is the everyday task. Open the Chooser from the Apple menu, then select the AppleShare icon to see a list of Macs with shared files.
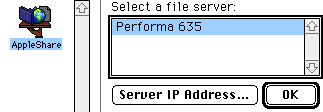 Select the desired Mac, then OK to see its shared files. Select Server
IP Address... to connect to an unlisted Mac via TCP/IP (if allowed by
File Sharing, as detailed above).
Select the desired Mac, then OK to see its shared files. Select Server
IP Address... to connect to an unlisted Mac via TCP/IP (if allowed by
File Sharing, as detailed above). The
Network Browser program, which comes with recent Mac OS versions,
lists shared files under Local Services. If you access shared files
frequently, you can add specific Macs to your Favorites list or drag
them to the Desktop for quick access.
The
Network Browser program, which comes with recent Mac OS versions,
lists shared files under Local Services. If you access shared files
frequently, you can add specific Macs to your Favorites list or drag
them to the Desktop for quick access.