Graphics and the Internet
JPEGs and JPEG Compression
Hello again! This month we’re looking at JPEGs (pronounced “JAY-pegs”). JPEG is one of the two most popular bitmap image file formats used on the Internet (the other being GIF). But what is a JPEG? Well, it’s not something to hang your JCLOTHES on. It’s not even a file format; it’s an acronym for “Joint Photographic Experts Group,” which doesn’t help our understanding of the JPEG at all. What do they do at this Experts Group anyhow? Maybe they meet every second Tuesday of the month in somebody’s shed-cum-darkroom to discuss expert photography. Who knows?
First, let’s see what a JPEG is. The JPEG standard was written by the committee known as (guess what) the Joint Photographic Experts Group, and it was designed for compressing full color or grayscale images (in particular, photographs and similar high-quality artwork). JPEG is a “lossy” file format; when the JPEG algorithm compresses the image, it reduces the size by chucking bits of the image away. You may think, “Hey! How does it know what to lose? What if it loses the really cute cat?” Well, it doesn’t work quite like that! JPEG compression plays on the fact that the human eye can only see so much. We have trouble seeing small color changes, so JPEG loses some of this subtle information. More on this later.
Second, here’s a shocker: JPEG is not actually a file format, though it is often referred to as one. JPEG is the name of the compression algorithm used to compress the image—the file format is JFIF, which stands for “JPEG File Interchange Format.” (So it really stands for “Joint Photographic Expert Group File Interchange Format.”) As that’s a bit long-winded, I’ll (inaccurately) refer to the file format as JPEG, as this is how it’s commonly known.
Bitmap File Formats
JPEG (really JFIF, remember) is a “bitmap image file format.” As you can gather from the name, this means that it’s an image made from a map of bits. Hmmm...not very helpful, though. The best way to describe it is to say that a bitmap image is like a piece of graph paper, where all the squares are lots of different colors. Close up, it just looks like a bunch of squares. From a distance, however, the squares form a coherent image. Here’s an example:

It’s like a bunch of squares on graph paper—you’ve got a bunch of x-coordinates and a bunch of y-coordinates. In real computer life though, each square isn’t called “a square on graph paper,” it’s called a “pixel,” which is short for “picture element.” (Well, it’s supposed to be, but where do they get that “x” from?)
These bitmap images are made up of a grid of pixels, and each pixel can be a different color. As you can imagine, the more pixels in your image, the better quality the picture, as there is more information given. As a side effect, the more pixels, the bigger the image file. The other factor concerning size with bitmap images is colors. I’ll explain why that is, but first, remember that computers can only count two numbers: zero and one.
 Let’s imagine a bitmap image that’s 10 pixels by 10 pixels. If we only had 0's and 1s to fill it with, we’d have a maximum of two colors: white represented by 0, and black represented by 1. Here’s what it looks like:
In real life, we have images that aren’t just black and white. So how do we get all the extra colors? Imagine our “0 and 1” image above is on a transparent sheet. If we place another image of 0s and 1s underneath, we create extra possibilities.
If we look at an individual square on our bitmap image, there are four possible combinations of 0s and 1s. First, our square could have a 0 on both the top sheet and the bottom sheet. Second, it could have a 1 on the top sheet and a 0 on the bottom. Third, it could have a 0 on top and a 1 on the bottom. Finally, it could have a 1 on both sheets. This gives us a total of four possible colors. Hey-now we’re getting somewhere! As you can see, the more transparent sheets we have, the more colors are available to us.
Just as image size is determined by the number of pixels, it’s also determined by the number of “bit-planes” (our transparent sheets). An image containing two bit-planes (four colors) contains twice as much information as an image with one bit-plane (two colors). Here’s a quick rundown:
Bit-planes | Colors (also called “Depth”) Available |
|---|---|
1 | 2 |
2 | 4 |
3 | 8 |
4 | 16 |
8 | 256 |
16 | 65,536 |
24 | 16,777,216 |
Pictures with 32 bit-planes also show 16.7 million colors, but they use the rest of the “colors” available for what’s called an alpha-plane, which works like a mask and deals with transparency.
With any luck, you now understand what a bitmap image is. Now, let’s find out why we need to use JPEGs on the Web.
Download Speed
If you have a homepage, you may wish to put on some photographs of yourself and your family on your site. Maybe you’ve got some scans on your hard drive you’d like to put on your Web site. Have a look at the sizes of them; if they’re Photoshop files and of fairly large dimensions, you may find that they’re very big—maybe 1 MB, 5 MB, 10 MB, 50 MB, or even 100 MB.
Imagine viewing a page using a 28K modem when one of the images is a 1 MB picture file; it’ll take some time to download. No one, apart from maybe you and a few understanding friends, is going to wait 20 minutes or more to see a picture of your cat. Sorry if that’s harsh, but it’s true. If you’re producing images for a Web site, they need to download quickly, or you’ll lose people’s interest.
JPEG compression, as I mentioned earlier, makes your images smaller by throwing unnecessary information away. The best thing about this is that you can choose how much information is lost. There’s a trade off, as you can imagine. The smaller you make your image (in file size) the poorer quality your image will have. We can understand this more clearly by looking at how the JPEG compression algorithm shrinks images.
JPEG Compression
JPEG compression works by playing on the fact that the human eye can only see so much. We have trouble seeing small color changes, for example. Any information that we’re unlikely to notice gets trashed. However, the more the image is compressed, the more noticeable the losses are. You’ve probably seen badly compressed JPEGs, which appear fuzzy and blocky, and have poor colors.

If you want to compare different levels of compression on the same image, follow the links below:
- Good-quality, slow-loading image (100K)
- Average-quality image (20K)
- Poor-quality, fast-loading image (8K)
As you can see, there isn’t a great deal of difference between the average- and the good-quality image (in terms of apparent quality). Note, however, that there’s a big difference in file size.
Let’s have a look at a few types of images that by their very nature don’t compress well using JPEG. The one thing to learn about JPEGs is when (and when not) to use them.
JPEGs don’t work very well with high-contrast images (e.g., text, line drawings, and basic cartoons). Another way people often go wrong is by placing high-contrast text onto a photo. It can look very strange-you’ll get a kind of ghostly halo around the text. If you’re unsure about whether to save your Web graphics as a JPEG or a GIF, the best thing to do is save your image as both a good-quality JPEG and a GIF, then see which one is smaller.
Saving Options
There are lots of different options for saving images as JPEGs. Most of them go unclicked. Here, I’ll go through the most common options and explain them.
-
Slidey Scale
Not the official name for this. Normally it’s called “Quality” or “Compression.” This determines how good the quality will be and how much to compress the image. Here’s the one from GraphicConverter.
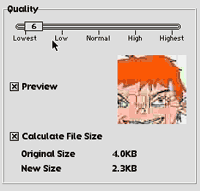 It’s marked “Lowest Quality” to “Highest Quality,” with 100 different settings in between. Some other programs give you a scale from 1 to 10. Early versions of Photoshop gave you “High/Medium/Low.”
Be aware, however, that a 1 to 100 scale, for example, isn’t a scale of percentage of quality—they’re just arbitrary figures. “Quality 50” on one program’s scale could be “Quality 80” on another’s. So if somebody says “I saved this JPEG at Quality 45,” it means nothing unless you know what software was used.
Most good programs have a preview picture so that you can see what the image will look like at the currently selected compression rate. You want to aim for the lowest you can get without making the image look blocky. Once you can start to see a visible degradation of quality, move back up a notch and stop there.
You may often get another Slidey Scale called “Smoothing.” Sliding this up and down adjusts the quality of the curves and angles of the image. Again, you’ll need to adjust this until you’re happy with the image. -
Save As Progressive JPEG/Save As Baseline JPEG
This is often an option you can turn on and off with a check-box. The default is normally set to “Save as Baseline.”
Non-progressive (or Baseline) JPEGs are saved as a single top-to-bottom scan. When you load them in a Web browser you see the top line first, then the second line, and so on until you see the last line. It’s a bit like covering your monitor up with a piece of paper and gradually moving it downwards.
Progressive JPEGs are saved as a series of several scans. The first scan is poor quality, thus it takes up little space and loads very quickly. Each subsequent scan is of better quality, so when viewing a Progressive JPEG on the Internet you get the impression of a very badly compressed JPEG picture appearing to get better and better in quality as it loads. The advantages of this are that your images appear to load faster and the viewer has something to look at a lot sooner. Some programs (e.g., Photoshop) allow you to specify the number of scans the image will have.
Progressive JPEG files are smaller than their Baseline equivalents. However, viewing a Progressive JPEG takes up more RAM than viewing a Baseline JPEG.
Another downside is that many older graphics programs cannot handle Progressive JPEGs and will refuse to display them—or, they may just flip out and crash altogether. Remember to “know your target audience.” If you know that 95% of your surfers use browsers that support Progressive JPEGs, then go ahead and use them. If only 20% do, don’t even go there. I’ll be looking at this in more detail in a future column about general Web site design. In the meantime, back to JPEGs: here’s a diagram showing the difference between Baseline and Progressive JPEGs.
Some more recent programs give you the option to save as an Optimized Baseline JPEG. This squeezes a few more K from your image. Again, this option isn’t supported by earlier programs (for reading and writing the files).

-
Save as QuickTime JPEG
This is another check-box that’s often available. Many older Mac-based graphics programs use Apple’s JPEG implementation to read and write JPEGs. This is part of QuickTime.
Be aware, however, that QuickTime (from version 3) can read progressive JPEGs but will not save them. Also QuickTime’s JPEG format is PICT/JPEG and not JFIF/JPEG. As I mentioned earlier, JFIF is the main JPEG format on the Web, so it’s best to skip the QuickTime option for Web graphics. It goes without saying that you’ll also need a version of QuickTime (from version 3 for best compatibility) to use this option. -
Save Paths
Uncheck this one. There’s no need to save paths for Web images.
These are the most common options you’ll encounter. There are obviously lots more in high-end software like Photoshop, but many of these are unsuitable for Net use. Please remember that you’ll achieve different results using different software. What looks okay saved in GraphicConverter may look even better in Fireworks. It’s worth experimenting in different programs to find out which one gives the best results for your images.
 |
© 2000 by David Knopfler, http://www.knopfler.com |
Facts, Hints, and Tips for Working with JPEGs
- Make sure that you’re saving an image that is best optimized for JPEG compression. I discussed this earlier, but in summary, JPEGs are for photos and quality art, and GIFs are for basic and simple images.
- When you’re creating an image for the Internet, make sure you save it as a non-lossy file format (e.g., TIFF, PICT, Photoshop) before you export it as a JPEG file. This way, you’ll always have an original to work from, before compression. (Remember, JPEG compression throws away image information.) Imagine if your only copy of your original picture is the compressed JPEG on your Web site. If you need to make an alteration to the picture, and you resave it as a JPEG, it will suffer the consequences of JPEG compression twice—making it look terrible! Remember to keep good-quality copies of the original pieces.
- If the file size of your JPEG image is too large, but you don’t want to lose any more quality, consider cropping or shrinking the image. This is certain to save you a few bytes.
- If you have lots of large images on a page of your site, consider making a set of smaller images that link to the larger ones. These are called “thumbnails,” and I’ll be discussing them in a future column.
 Don’t rely on JPEG colors. If you save a JPEG with a particular color, don’t think that it will blend seamlessly with the same-colored background on your Web page (see the picture below). Due to the way JPEG compression works, you’ll end up with a slightly different color, and possibly a bit of dithering-especially on low-end systems that only support 256 colors. (If your Mac is told to display a color it cannot, it creates the illusion of this color by placing lots of similarly colored pixels near each other; this is called dithering). You’ll find a problem with this even when saving with white backgrounds. In summary, don’t trust JPEG colors. The color on the left was saved as a JPEG (shown on the right). The color difference is minimal, but if you want to match colors JPEG is a no-no.
- Try sharpening your images before you export them as JPEGs. This will often produce better quality results, although you might incur a slight file size increase. As with all JPEG work, it’s well worth experimenting with different settings.
- Make sure you start off with a good image (e.g., if it’s a scan, make it a good scan). The better the quality of the image you start with, the better the resulting JPEG.
- Save your image at the size you are intending to display it on-screen. There’s no point in saving an image as 100x100 pixels if it’s going to be displayed on your site at 50 x 50 pixels. If you use a different size image from what you specify in the HTML, the browser will have to do extra work resizing the image. All this takes time, and in Web design, time is of the essence.
Resources
The following links will provide you with extra information and software:
- JPEG Information
- Tips On Saving JPEGs
- JPEG FAQ
- Shrinking Your JPEG Images
- Macromedia (Fireworks)
- GraphicConverter
-
Adobe (Photoshop, PhotoDeluxe)
Okay, that’s it for this month. I hope it’s been useful. Next month, tradition dictates that I should follow a JPEG column with a GIF one. However, I’ll be blowing away this convention and looking at how to design an effective banner advertisement. If you have any comments, queries about anything I’ve covered, or suggestions for things you want me to cover, why not drop me an e-mail?
![]() Copyright © 2000 by Grant Osborne,
gosborne@atpm.com.
Copyright © 2000 by Grant Osborne,
gosborne@atpm.com.
Also in This Series
- PNG · December 2000
- Seven New Deadly Internet Graphic Sins · November 2000
- Seven Deadly Internet Graphic Sins…or Things That Look Really Bad on Web Pages · October 2000
- The Animated GIF · September 2000
- The GIF File Format · August 2000
- Banner Advertisements · July 2000
- JPEGs and JPEG Compression · June 2000
- Help, I Can’t Draw! · May 2000
- Copyright · April 2000
- Complete Archive
Reader Comments (33)
- Does the 'save as' option result in the same loss of quality as simply 'save'?
- Do the following have an effect on image quality:
- Making copies of JPEG files without opening
- Uploading them on online albums
- Renaming them without making any changes
Thank you again for your help.If yes, my guess is that your Photoshop is somehow defaulted to some off-tilt color profile. Either that, or your camera embeds a color profile designed for PictureViewer, but I doubt that. More likely the other way around.
I'm not an expert on color management (my office, thankfully, pays a local service bureau to keep my monitor calibrated) but try this. Go to the Photoshop Edit menu, select Color Settings, turn off Color Management (I use a US Prepress setting at work, but I leave it off at home), and for good measure, set the RGB working space either to sRGB or, what I think is more preferable, to a Monitor RGB setting that has a description of your display following it. You might also want to set the CMYK space to generic CMYK profile, and the gray and spot to 10 or 20%. Also, turn off the Color Management Policies. As long as you're not planning to do work in Photoshop for use on a commercial press, these settings might cure your problem.
By all means, if another reader is more informed on this topic, please pipe in!
Thank you.
Thank you for this information. I have an additional question. We post Photoshop and Illustrator files to a company Intranet site for our clients. Some of these files are layered PDFs and are huge. We would like to post these as JPEGs, however our only concern is that the text becomes fuzzy and unreadable. Is there a way to save the files to combat this issue, or is there a JPEG reader that will allow an end user to zoom in to read text like a PDF file allows?
PDFs truly are your best option for proofing. I'm not exactly sure what you mean by "layered PDFs" because PDFs don't use layering in the manner you think of with Photoshop and Illustrator. Sure, objects do appear on top of each other, but you cannot turn layers on and off like you do in those graphic programs.
Anyway, what you want to do is distill your PDFs using something like medium or medium high JPEG compression (or it might be worded the other way around and you'd want medium or medium low quality). Also, set the PDF resolution to screen resolutio (72dpi) or bump up to 150 if you need graphics to be a little bit clearer. Distilling this way will dramatically reduce the size of your PDFs while letting your text remain vector and clear when zoomed close or printed.
However, occasionally I must manipulate photos in Photoshop V6.0 Mac before sending. I save as a jpg file. The file no longer appears on the desktop with the Quicktime icon, as does the original. This is fine, except that my colleagues receiving such files cannot read them if they do not have Photoshop. Is there any way I can create, from Photoshop 6, a file that has the Quicktime jpeg format (PICT/JPEG, I have learned from your excellent articles) versus the JFIF/JPEG format which seems to make Photoshop its default application?
For viewing photos, I find it a great more satisfactory to use QT Pictureviewer than opeing each into Photoshop. But for some receipients (without Photoshop), the reality is they cannot view my files at all.
What can I do?
Regards,
Matt Bird
There's simply no substitute for getting a high resolution image in the first place. If you're doing print jobs and using photos from the web, you should re-evaluate your image acquisition policies.
Where I work, I all but refuse web images. I try to not even accept photo-style inkjet printouts even if they're on the proper glossy paper. They still scan horribly. I tell people when they give me such a print that I'd much rather have a copy of the file they used to make that print than the print itself.
If you search VersionTracker or MacUpdate, you'll probably find a plethora of utilities that have better algorithms for enlarging digital photos. You'll have to try a couple and decide which is your favorite. They'll cost anywhere from free to hundreds of dollars.
Personally, if I HAVE to enlarge something a little bit, I just do it in Photoshop. Its algorithm is acceptable for perhaps up to about a 150% enlargement. Maybe even 200% depending on what you're working with. Any more, and degradation becomes much too apparent. And keep in mind that as much as 200% may not be enough to help you. Suppose you have a web photo that is 200 pixels square. That's fairly large on a web page, but is only 2/3 of an inch when redefined as a 300dpi image suitable for press. If you enlarged it to be four inches square at press resolution, you're blowing it up 600% !!
i need more information about jpeg comprssion . if a possible you gave some pdf or books about this way
thanks for your helping for me
Speaking completely literally, you cannot improve the resolution of a bitmap image. Enlarging them will always exaggerate the pixellation you see when you zoom in to a bitmap. The best advice is to always obtain larger digital images to begin with.
Having said that, the only tool I've seen that does better than any other with bitmap enlargements is Genuine Fractals.
Thank you so much for very educational web pages!
MK - JPG and JPEG are the same type of file. The JPG extension just makes JPEGs compatible with the common 3-letter extension that began in DOS and, to some degree, is used even on Macintosh computers. So, send the JPEGs. They're fine.
Add A Comment