How To Become a Network Guru in 10 Easy Steps
Part 5—Mixing Ethernet and LocalTalk Networks
As the new iMacs and G4s usher us into the second generation of beige-free Macintosh computing, twisted-pair Ethernet is the standard method of Macintosh networking. Every new Mac off the production line has built-in 10/100Base-T Ethernet but no serial ports. LocalTalk requires a serial port to function, so Ethernet is the only network option for these new Macs (aside from AirPort).
While the switch to Ethernetted, USB-only Macs is good for several reasons, it does cause problems for those who use LocalTalk printers and Macs or PowerBooks that lack an Ethernet adapter. Fortunately, there are a number of ways to make these LocalTalk devices work with an Ethernet network, a couple of which are even available for the low, low price of free.
An Overview of LocalTalk-to-Ethernet Bridges
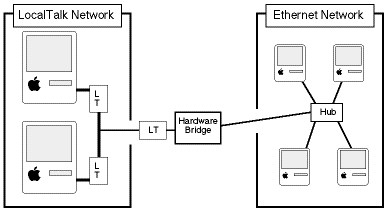
Hardware or software that connects one kind of network to another is called a bridge. A hardware bridge is a separate device that acts as the physical connection between the networks.
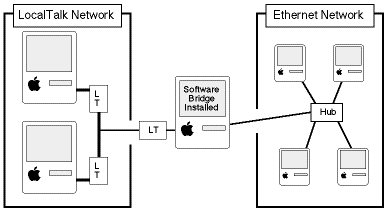
To use a software bridge, on the other hand, you install the software onto a Mac that’s connected to both networks.
As you can see from the diagram, using a software bridge requires that you have a Mac that can connect to both your Ethernet and LocalTalk networks. You also have to leave the Mac on, since the software bridge can’t do anything if the Mac is off.

The more convenient, if more expensive, way to connect LocalTalk and Ethernet networks is through a hardware bridge. Since the bridge runs automatically, you don’t need to leave a Mac on to make it work. Also, hardware bridges don't usually include software other than the diagnostic variety, so setup and maintenance is very easy. The downside of a hardware bridge is the cost, which is usually significantly higher than a software bridge. The most popular hardware bridge options are Farallon’s iPrint and Asante’s AsanteTalk. Each is in the $75-100 price range, depending on where you find it. Check the respective Web sites for info on where to find the hardware bridges.
Software bridges take a little longer to set up and require the continued use of a Mac, but they do win the price war. There used to be a variety of software bridge options, but the only one you need these days is Apple’s LocalTalk Bridge, which is a free download from the Apple Software Updates page.
Setting up a Hardware Bridge
Note that these setup instructions do not replace those in your bridge’s instruction manual, which may have instructions specific to your bridge. These steps give you a general idea of how the setups work.

- With the power off to all network devices (Macs and printers), connect the hardware bridge to the LocalTalk network. If there’s only one LocalTalk device, you can connect it to the bridge with a serial (printer) cable. If there is more than one device, you’ll need a LocalTalk adapter for each device and one for the bridge.
- Connect the bridge to the Ethernet network. If there’s only one Ethernet device, you can connect them with a crossover cable. If there’s more than one device, you’ll need to connect the bridge to your hub or switch.
- Turn the bridge and network devices on. Sometimes hardware bridges are picky about exactly when you turn things on. If your LocalTalk devices don’t appear on the Ethernet network right away, try changing the order in which you turn things on (bridge first, LocalTalk devices later, and vice versa).
Setting up a Software Bridge
Note that these setup instructions do not replace those in your bridge’s instruction manual, which may have instructions specific to your bridge. These steps give you a general idea of how the setups work.
- Connect one Mac to both the LocalTalk and Ethernet networks.
- Install the software bridge on a Mac connected to both LocalTalk and Ethernet networks.
- Restart the Mac.
- Open the AppleTalk control panel (some Macs will have the Network control panel instead) and set your connection to Ethernet.
- Open the Chooser or Network Browser and use your new, expanded network.
Using a Bridge for your Printer
Many people, especially those who own a new Mac, want to use their old printer with the new Mac, but don’t know how to do it. It’s possible to use a LocalTalk-to-Ethernet bridge to get your old printer working with the new Mac, but only if your printer is LocalTalk-ready, meaning that it can connect directly to a LocalTalk network. Most printers aren’t LocalTalk-ready, but you should check the printer documentation or the printer maker’s Web site to be sure. If your printer is LocalTalk-ready, you can connect it to your new Mac as shown below.

As mentioned above, you can use a serial cable if the printer is the only LocalTalk device, but you’ll need one LocalTalk adapter each if there are other devices.
Also in This Series
- Mac to Windows: Troubleshooting the “No Logon Servers Available” File Sharing Error · October 2004
- Using WEP Security on an AirPort Network · July 2004
- Whatever happened to…Threemacs.com? · September 2003
- Clandestine Wireless Networking and MacStumbler · July 2003
- Learning to Share With Others: Sharing Preferences Overview · April 2003
- Serving Files Using FTP in Mac OS X · December 2002
- Switching Between Networks in Mac OS X · November 2002
- The Audio/Video Quadras (660av, 840av) · September 2002
- Thoughts on Apple’s Xserve · July 2002
- Complete Archive
Reader Comments (2)
I was strugling to get the necessery info on connecting ethernet and Appletalk networks.
This site provided me with what I wanted. Thanks a lot.
Regards!
C. Raja
Add A Comment