How To
Making Your Mac as Smart as Its Owner
I’m beginning to think that Apple wants its customers to get to work. First, it builds hardware that’s reliable and just keeps working. Then, it adds an operating system with phenomenal uptime. Finally, the operating system includes numerous small touches to make your computing life easier: Automator and AppleScript handle repetitive tasks, speakable items allows you to control your Mac without using your hands, and contextual menus and commands are where you need them when you need them.
In the last few months, I’ve written about some of these features, but I’ve omitted one that probably should have been discussed long ago. Your Mac wants you to work smart, not hard. It’s even willing to help you along by creating smart playlists in iTunes, smart groups in Address Book, smart folders in the Finder, and smart mailboxes in Mail. Let’s take a look at the “smart” concept in general before looking at what each of these features can do for you.
“Smart” Features and How They Work
Wouldn’t it be nice if you had a personal assistant who could get the files you want quickly from almost any location and collect them in one place? With Mac OS X “smart” features you can have that at your disposal: smart assistants that find the things you need based on criteria you specify.
Are you tired having to update a playlist every time you add new tracks by your favorite artist? Ever needed to separate the work contacts in Address Book from your family contacts? I’m sure you’ve never had to look for a missing file right before a deadline. Looking for one file is bad enough, but looking for more than one can quickly become a time sink. Unless you’re highly organized, the ten files that you created for a project six months ago are now scattered throughout your hard drive. It might take you a while to find the ones you need. Using OS X’s smart features you can now find any of that information quickly.
The idea of using virtual folders and file locations to organize files has been implemented in a variety of forms across several operating systems. They may have first appeared as “saved queries” in BeOS during the mid-1990s. BeOS software developer Dominic Giampaolo began working for Apple in 2002, and smart folders and Spotlight made their way into Tiger by 2005. If you review the history of smart folders, you’ll discover that even Windows has an implementation of this concept. No matter what these assistants are called, they all depend on a good search engine to find the target files—on the Mac that often means depending heavily on Spotlight.
All of these smart assistants have one other thing in common: you develop the rules used to locate the information that you need. Although you can use them for just about any task, they are most useful for those tasks that are going to be repeated frequently. They’re also useful for things that you might forget to update, such as iTunes playlists. Once you create the rules and save the results, they’re always at your disposal whenever you need them. As you add new files that meet the criteria you’ve set, new files are added to the search results without any intervention on your part. If you’re not finding the information you need, change the search criteria and the results change accordingly.
Now that we’ve had a history lesson, let’s see if we can put these features to use. I’ll introduce them in the order that I learned about them.
First Steps: iTunes Smart Playlists
Smart playlists have become one of my favorite iTunes features, but it didn’t start out that way. When Apple announced iTunes 3’s smart playlists, I either wasn’t paying attention or just didn’t get too excited. After all, I didn’t have any music on my computer at the time, so this didn’t affect me. As I moved my music collection from CDs to computer files, I discovered a problem: if I set up a playlist for one of my favorite artists, I had to update the playlist manually every time I added or removed content for that artist. The whole process of creating a playlist, dragging files to that playlist, adding new content, and repeating the process was taking too long. Then someone introduced me to the revolution known as smart playlists. Once I have the smart playlist created and the right rule defined, I don’t have to worry about updating the playlist: iTunes takes care of that for me as long as I have the “Live updating” feature checked.
I’ve written about smart playlists in a previous article. For that article, I created a smart playlist that excluded podcasts and holiday music. Given the way my music was organized at the time, if I had followed my usual practice of just starting iTunes and clicking “Play,” the first song heard would have been something from Aaron Neville’s “Soulful Christmas” album. That’s fine for the recent snow we’ve had in Louisiana but not what I want to hear in the middle of summer. I also needed to exclude podcasts for those times when I wanted to focus on music. That smart playlist was one of the first I created, and it’s easy to do.
Launch iTunes and choose “New Smart Playlist” from iTunes’ File menu (Command-Option-N). When the Smart Playlist creation dialog appears, use the pop-up menus to create the first rule. The first pop-up menu tells iTunes what metadata to examine (Artist, Genre, etc). In this case, I set it to examine the Genre field. The content of the middle pop-up menu will vary depending upon the information you are examining, but in this case I set it to “does not include” since I want to exclude certain content. Set the third field to Podcast, as it is in the example. This portion of the rule excluded any media tagged as a podcast from the resulting playlist.
Since there is additional information I want to exclude, click the plus sign. A second series of pop-up menus will appear. Repeat the process for rule two with the settings Genre, “does not contain,” and Holiday. If you don’t have any holiday music to exclude, you can either choose another genre or exclude this rule altogether. Click the “Match” checkbox at the top of the dialog and set it to all if you want this playlist to include only items that meet “all” of your criteria. The “any” option is broader and includes content that meets any of your criteria. If you want the information in this playlist to update automatically, choose “Live updating.” You can also set the size of the playlist and organize it randomly. When you are finished setting the rules, click OK to create the playlist. Congratulations: you’ve just created your first smart playlist.
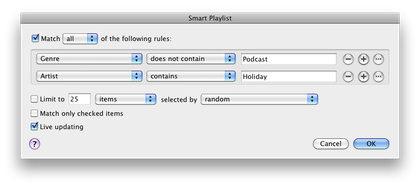
Completed Smart Playlists Dialog
When iTunes saves your smart playlist, it appears as a purple folder in the “PLAYLISTS” section of the source list. If you’d like a few ideas of what this type of playlist can do, Control-click one of the pre-defined smart playlists such as “Recently Played” and select “Edit Smart Playlist”; you will be able to examine the criteria used to create that playlist. You can also use this feature if you ever need to refine the rules for one of your smart playlists.
Smart Groups in Address Book
Mac OS X’s search technology appears in Address Book as smart groups. With this feature you can search a large collection of contacts and separate them into groups based on your chosen criteria. I used this feature in the past as a prelude to sending automated birthday greetings via Automator. It is the smart groups feature in Address Book that Automator uses to collect the names, addresses, and e-mail addresses of the people who should receive birthday greetings.
The process of creating smart groups in Address Book is the same as creating smart playlists in iTunes. Choose “New Smart Group” from Address Book’s File menu (or press Command-Option-N) and complete the resulting dialog. In a dialog that looks similar to the one for iTunes smart playlists, the first pop-up menu tells Address Book what field to examine in each contact. The remainder of the pop-up menus help you set criteria that contacts must meet to be included in the group. The content of these menus will vary somewhat depending on how you complete the beginning of the rule.
Just as in iTunes, you can use additional rules to narrow the scope of the group. In the example, my first rule looks for contacts with birthdays sometime in the next two months. The second rule limits the group to contacts whose e-mail field does not contain the “@” symbol. These two rules combine to generate a group of contacts with birthdays in the next two months that do not have e-mail addresses. If I choose to, I could send members of this group an old-fashioned birthday card.
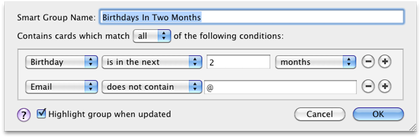
Completed Smart Group Rule
Using Smart Mailboxes
I’m just beginning to use smart mailboxes. Their function is simple: gather messages and to-dos from other mailboxes based upon criteria that you specify. Go to the Mailbox menu and choose “New Smart Mailbox.” You’ll be presented with a dialog similar to that used in other “smart” features. The pop-up menus present options that are related to managing e-mail. You can also create smart mailboxes by clicking the plus sign at the bottom of Mail’s sidebar. As with other smart options, you can combine several rules to narrow the results of your search. You can also opt to include messages in the “Sent” and “Trash” mailboxes.
In the process of writing this article, I created a smart mailbox that contains all of my ATPM-related correspondence. I had a regular mailbox that did the same thing using Mail’s rules feature, but I like the smart mailboxes feature a bit better for this task. It’s a bit faster to create the smart mailbox than to set the necessary rules in Mail’s preferences. I can also use a smart mailbox not only to collect incoming ATPM mail but also to collect related items in the Sent and Trash folders in one place. I’m going to be experimenting with both options in the coming weeks to see which works best for my needs.
I also discovered another instance where smart mailboxes might be better than mail rules. Several days ago, I received an e-mail update about some music collections that were available in the iTunes Music Store. I didn’t have time to look at the message right then, so I left it for another day. Before I had an opportunity to read that e-mail, it disappeared. A quick glance in Mail’s Trash yielded nothing relevant. I already had a regular Mail rule in place that collected all iTunes-related messages from my inbox, but the message wasn’t there either. I created a smart mailbox to find all mail where the “From” field contained iTunes. As soon as I closed the dialog, the list of e-mails was created, and the one I needed happened to be at the top of the list since it was the most recent. Somehow the message had been relocated into my main inbox.
This is one time I am glad I used the smart mailbox feature to search for the answer. I simply could have launched iTunes and gone to the music store. Since I knew there was a link to the new collections on the main page, I eventually would have found what I wanted, but it would have taken much longer than creating the smart mailbox. I suspect it was also cheaper to create a smart mailbox since, while searching for one collection, I’d probably have found and purchased several others.
Using Smart Folders
Like all the smart features discussed thus far, smart folders make use of user-generated rules to search for data that match those rules. This is another feature that I am just beginning to make use of, but it has potential. You may have been making use of this feature already without realizing it. Open a Finder window and look at the sidebar. It usually contains three purple folders entitled “All Documents,” “All Movies,” and “All Images.” Your sidebar will also contain any smart folders you have chosen to add to this list. Control-clicking a folder and selecting “Show Search Criteria” will show the criteria for that folder at the top of its window. The “All Images” folder, for example, uses a rule set to “Kind is Image” and results set to show All.
Just as with the other “smart” features, smart folders can combine multiple rules to narrow the results of your search. Changing the rules yields a different set of results. Once the rules are set, the criteria can be saved for re-use. Here’s one example of how I put this technology to use.
When I started thinking about this article, I knew that I wanted to use screenshots of the Smart Playlist and Smart Group dialogs. They were still on my hard drive. Finding them quickly would be faster than creating new screenshots. I had an idea of where they were on the hard drive, but that folder was a mess. If there were ever a time to use smart folders, this was it. At this point I knew three things that helped me set the rules: the files were on my Mac’s hard drive, they were all TIFF files, and they all had the word “smart” in the filename. This was all I needed to know to create the smart folder.
Start by going to the Finder’s File menu and choosing “New Smart Folder” (or press Command-Option-N). A new window will appear with options such as “This Mac,” “Shared,” “Contents,” and “Filename” across the top of the window. The name of your boot drive will also appear in this list. Choosing from among these options is a good first step to narrowing your search. I chose “This Mac,” for example, because the files were not in one of my shared folders. I tried clicking both the “Filename” and “Contents” options but still had no results. It took me a moment to realize that these options weren’t working because I had defined the search location but not what to find. I could have clicked either “Contents” (to search inside of files) or “Filename” and entered basic search criteria in the search box at the top of the window, but I wanted to be more specific. Let’s add a few rules to narrow the search.
Add your first rule by clicking the “+” symbol in the window that just opened. It’s small enough to be missed the first time you look at this window. As a reference point, it is at the far right edge of the window next to the Save button. When the first line appears, leave the first pop-up set to “Kind” and change the second one from “Any” to “Image.” A third item appears that is set to “All” by default. I changed this to “TIFF” since I know this is the type of image I wanted to locate.
Left with just this rule in place, I would still have to search through more than 400 files. Time to add a second rule by clicking the “+” button again. The first option is set to “Kind” by default and must be changed to “Name.” With this field set, a second set of options appears which should be set to “Contains.”
When the third option appears, enter a partial filename. I entered the word “Smart” since that’s the part of the name that all of my target files have in common. At this point, the 400+ files were reduced to ten with the needed files visible in the window. I stopped there but probably could have reduced the search further and produced the two files I needed.
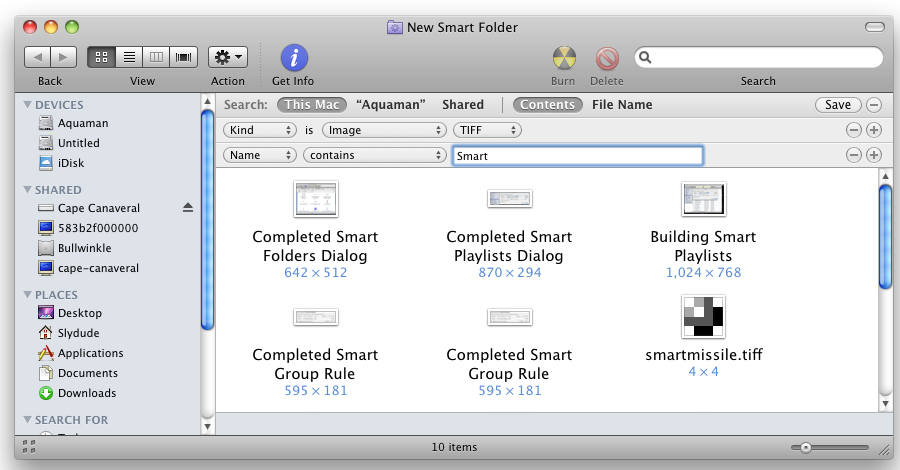
Completed Smart Folders Dialog
Try this search with your own system and you will get different results—especially by changing the partial filename in the second rule. Once you have got a result to your liking, the smart folder can be saved for repeated use. Your saved searches are stored in ~/Library/Saved Searches. There are also several pre-done searches included in the System folder at /System/Library/CoreServices/Finder.app. From there, you must Control-click Finder and choose “Show Package Contents” from the contextual menu. Then open the following sequence of folders: Contents, Resources, and CannedSearches.
Before we leave smart folders, there are a few things worth noting that will make them more useful to you. First, by Control-clicking one of your saved searches and choosing “Show Search Criteria” you can modify an existing search to include new parameters. If you use this method to save a search, you will not be prompted for a new folder name. Second, when creating a new rule, the first field is aware of several other types of metadata in addition to “Kind.” If your data type isn’t here, choose “Other.” You will be presented with a rather extensive list of other data types that can be the basis for a search.
Final Thoughts
There are two improvements I would personally like to see in a future update that might make these smart features even more intelligent. First, how about an easy way to add metadata when a file is saved—from right within the Save dialog? Just think how useful smart folders would be if everything on your Mac were tagged with the appropriate metadata. Second, how about an easy way to create smart mailboxes based on Boolean searches? I have seen a few hints for this but haven’t explored them yet.
I am sure there is much more that can be done with these features than I have explored thus far. Some of them are, as you can tell, somewhat new to me. Having said that, the more familiar I become with these features the more useful they are to me. It is certainly well worth the effort.
![]() Copyright © 2010 Sylvester Roque, sroque@atpm.com.
Copyright © 2010 Sylvester Roque, sroque@atpm.com.
Also in This Series
- Give Alert Sounds a Little Personality · March 2012
- Create Your Own iPhone Ringtones · February 2012
- Create Your Own Homemade Audio Book · December 2011
- Upgrade to Lion Painlessly · August 2011
- Make the Most of TextEdit · July 2011
- Using the Free Disk Utility on Your Mac · May 2011
- Making Use of QuickTime X · March 2011
- Making the Most of What’s Already on Your Mac · February 2011
- Making the Most of What’s Already on Your Mac · January 2011
- Complete Archive
Reader Comments (2)
Thank you very much. I agree about the easy way to add metadata. I think I'll look at trying Automator or a script to facilitate that until Steve and company decide to make it an official "feature". Thank you again.
Terrific writing! If I had a "Thumbs Up" I'd send it to you.
I'm also wondering about using Automator for this task. I hadn't thought of AppleScript for this. My skills in that area leave a lot to be desired. Keep us posted with any solutions you concoct and I will do likewise. Surely there must be something out there to handle this task.
Add A Comment