How To
Making Your Own Speakable Items
If Mr. Scott had arrived on Earth a few years later he could have used Speakable Items rather than the keyboard.
Several times in the last few years I have mentioned to friends that I should write more often about the amazing things that can be done using only the software that ships with your Mac. I usually either have a hard time thinking of an idea or I end up thinking it’s an idea everyone knows how to do. Sometimes I spot something interesting that someone else has done, and I am lucky enough to convince them to tell you about it.
As some of you know I became fascinated with Automator shortly after it was introduced in Mac OS X 10.4. It’s one of my candidates for most under-used Mac features. Some time ago I began haunting Apple’s discussion forums and periodically searching for all references to Automator. Most of the time I learn something new, and sometimes I actually know the answer to a question someone has asked. A few months ago, all of those things happened at once, and I started to wonder whether you could use the Speakable Items feature, which is still around in Mac OS X, to control Automator workflows. The short answer is that you can, so let’s get right to work figuring out how it’s done.
What Is Speakable Items?
At its heart, the concept of Speakable Items, Apple’s basic speech recognition technology that ships with every Mac, is simple: you command your Mac verbally, and it does what you say. My first recollection of any encounter with this technology was some time well after it was introduced. My wife walked into our home office one day because she thought I was talking to someone. She was somewhat puzzled to discover that the computer was telling me knock knock jokes. When I asked “Who’s there,” the computer responded with the next line of the joke. Her reaction was priceless.
Speakable Items first shipped as part of Apple’s PlainTalk speech recognition software. Initially available only on Quadra AV models, it was later included as part of System 7.1.2 and remains a part of the operating system to this day. Unfortunately, it didn’t arrive in time to help Mr. Scott avoid using the keyboard.
You don’t have to go out and purchase dedicated speech recognition hardware to make this work, though some users will need to add a microphone. In limited testing I have successfully used the internal microphone on my MacBook Pro as well as an external mic that I use regularly for podcasting. Both setups provide acceptable results, but I would probably get better results from any good headset microphone to help reduce interference from background noise. I have had a few instances of difficulty getting Speakable Items to recognize my voice. It seems to occur more often when using the MacBook Pro’s internal microphone in noisy environments—otherwise it has been a great experience.
If you would like a look at some of the pre-defined tasks that can be accomplished using this feature, open the Speech preference pane and select the Speech Recognition tab. Now select the Commands tab. When the window switches, choose the Open Speakable Items option. If a command you would like to carry out isn’t there, don’t worry. By the time we’re done you’ll know how to add your own commands.
How Do I Use It?
The first thing we need to do is launch and configure Speakable Items. Start the process by opening the Speech preference pane. Make sure that you are working in the Speech Recognition tab and that Speakable Items is On. Make sure that the microphone that you will be using is connected and select it in the microphone pop-up menu. Some external microphone connections may appear in this menu as simply “Line In.” Many of the options are pretty self-explanatory, and the help files are well-written, so don’t be afraid.
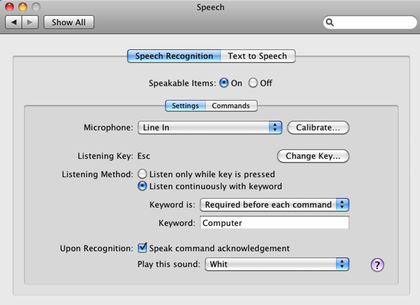
Configuring Speakable Items
The Listening Key is set to the Escape key by default. This can be changed by clicking “Change key…” and choosing a different key in the dialog that appears. This can be important depending upon which of the radio buttons you choose below that.
Using these radio buttons you can choose to have the computer only listen for commands when the listen key is pressed or listen for commands in association with a specific keyword. If you choose to have the computer listen for a keyword, the command that you speak is executed only if you say the command in conjunction with the keyword. Personally, I choose to have the computer listen for a keyword so I don’t have to touch the keyboard just to issue a command.
The Keyword is pop-up has options for how the computer responds to your chosen keyword. The settings here allow the keyword to be optional, required before each command, or required either 15 or 30 seconds after the last command. Clicking inside the “keyword” field allows you to choose a new keyword.
Before leaving this window we must take a few minutes to calibrate the microphone. Be sure the microphone is connected and the right connection is chosen from the pop-up menu. The calibration process is simple, takes only a few minutes, and should improve speech recognition accuracy.
The calibration process consists of speaking into the microphone and adjusting the slider until your voice is consistently registering in the middle of the green area. If you are consistently registering in the blue area, gradually move the slider toward the High setting. If you are consistently in the red area, move the slider closer to the Low setting. Keep at it until you are consistently in the middle of the green area.
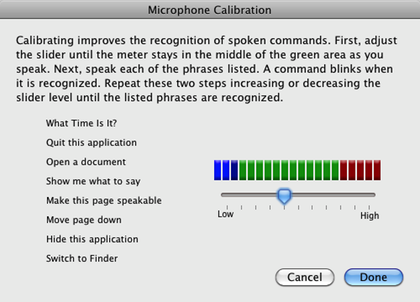
Microphone Calibration
The second part of the calibration process consists of speaking each of the commands in that window until the computer recognizes them. Try to speak in a natural voice and speak the commands as phrases rather than individual words. Apple’s help files for the Speakable Items feature recommend speaking each command a second time. You will know that a command has been recognized because the text blinks momentarily. Now that you have the configuration process completed, choose Done. Now let’s get down to making this a more useful feature.
Making Speakable Items More Useful
There are a number of pre-defined commands that get installed with the Speakable Items feature. A lot of these did not seem very helpful to me. Fortunately, Apple is famous for making applications and features that adapt to users rather than users adapting to the application. Why should the Speakable Item feature be any different? I did a little research and discovered that you can indeed add new items to the Speakable Items folder. In fact, Apple says that “you can use a command to open anything you can open by double-clicking, including applications, files, and Web sites. You can also write scripts and add them to the folder.”
Now I am not really a good scripter but after reading that document a very neat idea occurred to me. Speakable Items can be used to activate applications, and Automator workflows can be saved as applications. Why not combine the two and do something Apple didn’t include as one of the pre-defined commands?
With Speakable Items configured, the next step is to create an Automator workflow that does something we want to do. Let’s create an application that starts an Internet session by opening Safari, iChat, and Mail from a single command. While we are at it, let’s open a series of pages in tabs within a single Safari window.
Before we do anything with Automator, launch iChat, Safari, and Mail to make sure that they are connecting properly and performing as you expect. If you are going to open Web pages in tabs within Safari, make sure that you have taken steps to enable this feature. Now it’s time to launch Automator and have a little fun.
If you are new to Automator, check out my earlier Automator article for a review of the basics. It covers an earlier version of the program, but the basic principles remain the same. Pay particular attention to the “Getting Right Down to Work” section. The workflow described there is essentially the same one we will create today. I’ll give an abbreviated description of the workflow here. It should be fine for anyone with a little Automator experience. Type the name of each action into Automator’s search window, then drop the action into the rightmost pane of the Automator window. Click the small arrow on the upper left side of an action if you need to enter information.
- Connect to iChat.
- Log Into iChat and set the pop-up to log into all accounts, Bonjour, or just specific accounts.
- Set iChat Status and set the pop-up menu to your preferred status.
- Get Specified URLs. Expand the box to enter the names and URLs for the sites that you want to open each time the workflow runs.
- Display Webpages in Tabs. This is a custom action, not one that is installed by default in Automator. Kudos to ATPM Contributing Editor Eric Blair for a nice bit of work on that action.
- Get New Mail. Configure the pop-up menu to determine which accounts you would like to check
That’s all it takes to build this workflow.

Completed Workflow
Time for a little testing to make sure everything works as anticipated. Close iChat, Safari, and Mail as a prelude to testing this workflow. Now click Automator’s run button and watch to make sure that the workflow is functioning as you expect. If there is a problem, continue testing until you fix the problem. If all is well, choose Save As from Automator’s File menu and save the workflow as an application.
When saving the workflow choose a simple, descriptive name. This name is the command that you will use to launch it via Speakable Items. You can now place either your application or an alias to it in your Speakable Items folder. Apple’s help files suggest waiting about 20 seconds before attempting to access your new command.
Final Thoughts
Most of the time I use full-featured dictation software to control my Mac, but it’s nice to know that this option is available and so easily customized. In fairness, I should share credit for this article. The idea came to me after reading a question posted by EMH Mark I in the Apple Discussion Forum. I hadn’t though of this project until I tried to answer his question.
![]() Copyright © 2009 Sylvester Roque, sroque@atpm.com.
Copyright © 2009 Sylvester Roque, sroque@atpm.com.
Also in This Series
- Give Alert Sounds a Little Personality · March 2012
- Create Your Own iPhone Ringtones · February 2012
- Create Your Own Homemade Audio Book · December 2011
- Upgrade to Lion Painlessly · August 2011
- Make the Most of TextEdit · July 2011
- Using the Free Disk Utility on Your Mac · May 2011
- Making Use of QuickTime X · March 2011
- Making the Most of What’s Already on Your Mac · February 2011
- Making the Most of What’s Already on Your Mac · January 2011
- Complete Archive
Reader Comments (3)
I have been trying to find a good keyboard for soomeone who's visually impaired, and getting worse. Can you think of anyone whose product succeeds in this regard? Perhaps this would be a good subject for an article. Many Mac users are boomers, soon to be aging baby boomers. For some people, Speakable items alone might not suffice as a solution. Thanks, Nicky
After a quick search I was able to find a few options that might be helpful. Check out these options particularly the VisionBoard2 and BigKeys LX http://www.buypcsupplies.com/category/largeprintkeyboards/ The BigKeys series is available in several different layouts and the keys are one inch square.
As you can see there is quite a price range for these types of keyboards and some of them do not do a good job of describing whether they are Mac-campatable. Make sure you know the vendor's return policy before purchasing.
Add A Comment