Art Department
Transparency on the Web
"Yeah, it was when I received ATPM 4.03, so I had to step into action immediately." This was Ramon's motive for staying up until 3:00 AM writing a whole graphic section upon the topic I suggested last issue. So for this month, we have decided to put Ramon in the driver's seat. As for me, I will take a rest and enjoy the freedom of being an end user for a change. In the meantime, do not hesitate to send any graphic questions or contributions to <jghandour@atpm.com>.
GIF89a Export's "Hidden Feature"
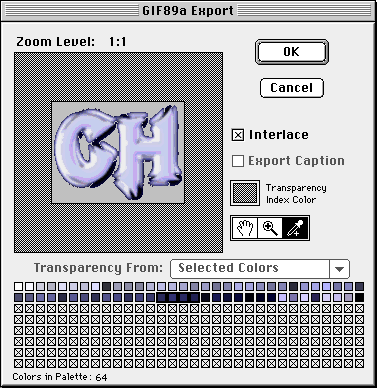
GIF89a export filter is powerful. Remember that the GIF89 export filter in Photoshop works differently when the image is already in indexed color mode. There, it displays an almost-WYSIWYG (dithered even if you are not using any dithering) preview of your image and lets you select colors to make transparent (as opposed to masking the transparent regions). This is quite handy sometimes.
Getting Rid of Borders Around Images
When trying to put a generally dark image on a page with a dark background, many people almost go crazy. Having either a white or an empty background in Photoshop and then making it transparent results in fringing remnants of pixels that form a border around your image. This is a result of anti-aliasing and alpha blending which Photoshop does automatically.
To solve the problem, just use your dominant background color as the background layer; it's as easy as that. Photoshop will automatically adapt alpha blending to the current background, and your images will look beautiful on your page. Here's an example (with multiple background tones though, variation with dominant color added too):

This is our starting visual:
It consists of 13 layers, uses 24-bit color, and is 180K in size.

This is our target background:
It has already been edited, saved in JPEG format,
and is 3K in size.

1. Crop the image as closely as possible to the region
you want on your page. This step is important, as it
reduces the number of colors in your image's back-
ground significantly.
2. Now index the colors. Use an adaptive palette, without dithering. Start out with a 6-bit palette, just to see how it looks. If it doesn't look good enough, climb to 7- or 8- bit.
3. That wasn't so bad, was it? Now export the image using the GIF89a export filter. Go to File/Export to do this. There, select the background colors you want transparent. The image will look severly distorted now, but don't worry.
4. As a final step, look at the image on the page background you want. Look at it right in the browser.
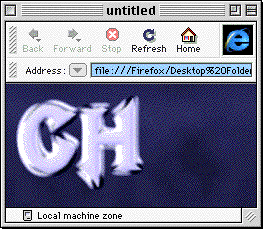
We went from 180K to 4 K in this example. We could have saved even more with a more advanced, but trickier technique. Instead of just using the same background for your image as for your page, try finding the dominant color of your background and using that.
Just replace step 1 with the following: Select the dominant color of your background. If this is more of a problem than you thought, try using the color picker tool to get a 3x3 or 5x5 average. Fill the background layer of your image with that color. The advantage of Photoshop in this area is that it will automatically correct the alpha blending around your image so that it fits the new background. Once finished, look at the result in your browser.

Using this technique you could replace this dark blue background with a screaming neon pink, and the image would still display without borders. Always remember to keep your original files (with layers and in full color), since you are never sure whether you want to change the appearance of your page later.
In this example we only saved 0.3K more, but for some images this technique produces startling results, both significantly decreasing image size and reducing the fringing.
Photoshop May Be Smart, But It's Not Wise
When indexing and selecting your palette (assuming you're not using Web-safe colors; I never do) don't let Photoshop choose! Most of the time, when starting out from a 24 or 16-bit image, you'll end up with a 8-bit adapted palette, diffusion dithering. You don't really want that. First of all, try turning off diffusion dithering. Any dithering really annoys me, so I try to get rid of it as quickly as possible. Just turn off that function and look at your image. Not satisfied? Ok, your old image is just a quick command-Z away. You might need dithering after all, but now let's add another twist. Set the palette to adapted, 5-bit. Yes, that's right, 5-bit. Sometimes dithering does amazing things, and you might end up with a good-looking image. If that doesn't work, undo and increase the bits. If you're lucky you'll end up with fewer than 8 bits, making your image smaller.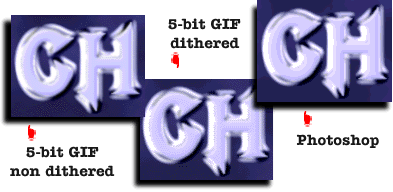
Something on the exact palette: Photoshop will sometimes convert your existing palette directly and offer you a preset exact palette when indexing. Don't always do that. Your image might look just the same with an adapted palette, diffusion dithering off, but with only half the colors! Let's say Photoshop offers you an exact palette with 201 colors. Try 128 or even 64 colors; you'll be surprised! From there, making good transparent regions is not hard at all. Try the "hidden feature" mentioned above for amazing results.
![]() Ramon Cahenzli is an independent webmaster and graphics designer working andliving in Switzerland. After finishing college he plans to go back to Spin, a Webdesign company and ISP for whom he already worked for a year. Currently he'stoo busy playing Myth to do anything else though.
Ramon Cahenzli is an independent webmaster and graphics designer working andliving in Switzerland. After finishing college he plans to go back to Spin, a Webdesign company and ISP for whom he already worked for a year. Currently he'stoo busy playing Myth to do anything else though.
Check out < http://www.spin.ch/~rca> for more graphics.
Also in This Series
- Burning Your Own Music CDs · December 1999
- PDFs · July 1999
- Batch Processing · April 1999
- The Path · March 1999
- Web Buttons · February 1999
- QuarkXPress Trapped · December 1998
- Removing Moiré · November 1998
- HTML Editors · October 1998
- Photoshop Actions · September 1998
- Complete Archive
Reader Comments (1)
Add A Comment