How To
Convert Stroke Masks to Transparency in Adobe Illustrator
The following tutorial was born out of a years-long struggle I’ve endured with my office’s current logo. Make no mistake that I’m not fond of that logo; however, I’m setting that fact aside for the purposes of this tutorial.
I’m also giving fair warning that the content of this tutorial is aimed at those with a reasonable working knowledge of Adobe Illustrator. This isn’t quite beginner material, and some of what I’ll discuss assumes a high level of familiarity with the application.
Since I am required to utilize the logo, I have often struggled to work around an issue left by its designer.

The graphic portion of my employer’s logo.
What you see in the image above is what happens when the logo is placed on top of a color other than white. The designer created a thick white stroke around the palm trees in order to have the horizontal lines stop short and not visibly touch the trees. The stroke outline covers over the horizontal lines, hiding them.
This would be fine if the logo were only used on top of white. Indeed, when it was designed, administrators had only given thought to printing it on white paper as stationery. Yes, I can make the stroke a different color if I place the logo on top of a solid-color shape, but that workaround is out the window if the background is multiple colors.
Adobe Illustrator has a command that normally would solve this problem. When one object is on top of another, the command can punch the shape of the upper object out of the lower object. However, this only works for the filled-in portion of an object. Strokes (an object’s outline) are ignored. But after more than a decade of battling this scenario, I’ve at last discovered the solution.
Before demonstrating with my office’s logo, I’ll share the technique with a much simpler shape.

Starting with simple shapes.
Beginning with two very simple shapes, the blue star overlaps the red rectangle. But similar to my office’s logo, I want a gap around the star so that the background shows through and the rectangle doesn’t appear to actually touch the star. You might think this is an easy fix—just apply a white stroke around the star at whatever thickness is desired.

The star now has a white outline.
Voilà. The task seems to be complete. But that outline is not transparent and will show up if I use a different color background.
I need to point out here that when a stroke is applied to an object, there is a choice of how that stroke follows the outline of the object:
- The center of the stroke can follow the edge, which means half of the stroke overlaps the outer edge of the object’s fill and half extends beyond the object’s fill.
- The entire stroke follows the inside of the object’s boundary, completely overlapping the object’s fill at it’s outline.
- The entire stroke follows just outside of the object’s boundary.
Normally, I’d want the third option. The first two will always make the filled portion of the object appear smaller because the stroke is either partially or completely overlapping the outer edge of the object. For this example, however, I’m going to leave the stroke set to follow center for two reasons. First, since the first option is the default way a stroke is applied, I’m not going to assume that a designer has changed it to follow the outer edge. Second, there may be some instances where overlapping the stroke was intentional, such as a preference for the appearance of an object’s fill when a center stroke is applied.
While simply adding a white stroke, as seen above, works perfectly fine for my shapes when they are on a white background, what happens if the background isn’t white?

A background color change reveals the stroke mask.
Suddenly, my gap around the star shows up as the white stroke it really is, instead of making the rectangle appear to not touch the star. OK, I can fix this. I’ll just change the stroke to the same color as the background.

Matching the stroke color to the background color.
There! I fixed it! (With apologies to the There, I Fixed It Web site.) Or did I? Suppose I just got a call from the client who says he wants a drop shadow on the rectangle.

The shadow reveals the stroke mask.
Whups, that doesn’t look right. But maybe it will be OK. The client called again to say he doesn’t want the shadow after all, but there’s a pattern that should be in the background.

Better, but the stroke mask is still visible.
Although it’s not as bad as when the shadow was applied, the stroke is still visible.
As I explained at the beginning of this tutorial, Illustrator has a command which could be the solution. It’s called Minus Front, and its function is simple—it punches the shape of an upper object out of an underlying object. The problem with Minus Front, as I’ve said, is that it only works with an object’s filled area, completely ignoring the stroke. This is exactly why my office’s logo has given me grief for so many years, because I didn’t know of any way to punch the shape of a stroke instead of (or in addition to) the filled object.
It turns out that I was thinking about the problem backwards. Instead of finding a way to use the Minus Front command on a stroke, which cannot be done, the solution is to convert the stroke into a filled object with no stroke, which can punch out another object.
Yes, it’s that simple, and it took me 10+ years to realize it.
Here’s the procedure. First, select the blue star which, at this point, has a green stroke around it. (The color of the stroke makes no difference.) Then, use the Object ‣ Path ‣ Outline Stroke command. This simple function is what eluded me for so long. After using this command, the object’s stroke will become a new filled object in the same shape as the original stroke. If the original object had a filled color, it will remain as-is, minus the original stroke. Neither of these objects will have a stroke of its own any more.

Applying the Outline Stroke command.
Enlarge the above image and look closely at the star’s green stroke. You’ll see a thin blue line that follows the stroke right in the middle of the stroke’s width. This line represents the outer boundary of the star’s blue fill, and it depicts what I described earlier about a stroke being applied as center, where half overlaps the object’s fill and half is outside of the object’s fill.
The two objects created by the Outline Stroke command (the blue-filled star and the green outline) will be grouped and must be ungrouped to continue. When this grouped object is selected, head to Object ‣ Ungroup.
Since the green stroke that was around the star is now an independent object that is filled and contains no stroke, it could now be used to punch the shape out of the rectangle with the Minus Front command. But not so fast. This stroke needs to punch out two objects—the rectangle and a thin outline of the star, which half of the original stroke covered. If the stroke had been set to follow the outer edge, this second punch wouldn’t be necessary.
Since the upper object is eliminated after it punches another object with the Minus Front command, two copies of the new stroke object that was created with the Outline Stroke command are needed. To get the second copy, select that new stroke object, select Edit ‣ Copy, and then Edit ‣ Paste in Back. This will make a copy in the exact same location as the original, but it will send it behind the original so it will be waiting for you when you’re ready for it.
If the stroke object needs to be punched out of even more overlapping objects, just repeat the Paste in Back command as many times as necessary. However, if you need to do this more than three or four times, there is an alternative which I’ll describe later.
After making sure that only the topmost stroke object and the blue star are selected, head to the Pathfinder palette (accessible in the View menu if it’s not already visible), and use the second Shape Mode button, Minus Front.
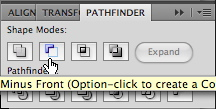
The Minus Front command in the Pathfinder palette.
Now, the star has reduced in size a little bit, representing its appearance when the green stroke had partially overlapped. Now, repeat for the rectangle by selecting the copy of the stroke object you made earlier, use the Object ‣ Arrange ‣ Bring to Front command to make sure it is above the rectangle (although it should already be), Shift-click the rectangle to select it as well, then use the same Minus Front command.

The stroke object has now punched out a shape from the rectangle and the star.
There it is. The background pattern shows through the gap. Click to enlarge the image above and you’ll see that the red rectangle is selected, and its control points are visible, which prove the object really was cut out by the stroke object. This procedure means that I can use a multi-color background, a drop shadow, or both.

Applying a drop shadow on top of a multi-color background.
There is one small caveat. If the blue star is moved away, I see that some possibly unwanted portions of the red rectangle are still present.

Remnants of the punched object.
What has happened here is that only the stroke object punched through. The filled area of the blue star wasn’t part of what punched the rectangle. But this is simple enough to fix. Just click to select the undesired leftover fill area on the right edge of the rectangle and delete it.
In order to put the star back in exactly the same place, I had moved it by using a counted number of arrow/cursor key nudges, but it doesn’t have to be moved at all. Alternatively, that leftover object could have been selected by using the Select ‣ Next Object Below command.
So, that takes care of the problem for a very simple design, but in the case of my office’s logo, it was considerably more tricky. Let’s look at that logo again:
My office’s logo with the stroke mask visible.
The procedure was more difficult for several reasons.
- The white stroke is actually not part of the visible brown palm trees. Instead, the designer duplicated the palm directly beneath and applied the stroke to the copy. My explanation is that he wanted the appearance of the center stroke mode as opposed to an outer stroke, while avoiding the stroke partially overlapping the fill area of the palms as it did with my blue star example.
- The palms were made up of numerous objects, all with the thick white stroke applied, but this was probably the easiest part to fix—I selected all the stroked objects that made up the palms and used the Unite command in the Pathfinder palette to make them a single object. A big plus to this was that since the stroked palm graphic beneath the actual palms also had a fill applied, the fill could be used to punch the horizontal lines as well as the stroke. As a result, I wasn’t left with a remnant to delete as I did above with the red rectangle.
- The horizontal lines, representing a sunrise, were individual stroked lines with no fill. Inasmuch as strokes cannot be used to punch a shape out of an object beneath, a stroke itself also cannot be the recipient of such a punch. Even worse, as can be seen below, the lines were all inside of a circular mask that is visible when I switch to Outline view mode.

Outline view mode reveals that the horizontal lines are actually all the same width and are being cropped into the form of a circle by a mask.
- Complicating matters even further was an additional layer of stroked objects on top of both the palms and the horizontal lines. This added layer was the words for the name of my office, which I have chosen not to show here. Suffice to say, after punching the stroke around the palms out of the horizontal lines, I then had to repeat the process to punch the stroke around the words out of both the palms and the horizontal lines.
Someone will probably point out that I could have worked with the horizontal lines as is, but I chose to temporarily remove them from the clipping mask to make sure I didn’t introduce any unforeseen problems. Easy to do: select any one of the lines, right-click (or Control-click if you have a single-button mouse), and choose Release Clipping Mask.

Temporarily eliminating the circular clipping mask.
It is important for me to remember that the object used to mask the horizontal lines into a circle is still there. It just isn’t visible because it contains no fill and no stroke. But if I hover the mouse pointer over its boundary, it is temporarily highlighted.

The “invisible” clipping mask circle will be right there waiting for me when I need it.
Because working with the commands to select objects that are beneath other objects is somewhat cumbersome to me, I’m going to move the brown palms out of the way. To make sure they get moved back into exactly the same position, I held down the Shift key and pressed the right arrow key 10 times to nudge the object off to the side a precise amount. (The Shift key multiplies the nudge amount by a value defined in preferences.)

Temporarily moving the palm tree graphic out of the way.
Notice how the horizontal lines touch the palm tree object when there’s no white stroke to mask them? Just as before with the blue star, it’s time to convert the white stroke into a filled object.

Using the Outline Stroke command on the palm tree’s stroke mask.
Same procedure as before: Object ‣ Path ‣ Outline Stroke. Then, I can use the same command on the horizontal lines to change them into filled objects which can be punched. In this case, they were grouped together, so I only needed to select one of them and repeat the Outline Stroke command.

Converting the horizontal lines to non-stroked, filled objects.
The next step took me a little while to figure out. I said earlier that there was an alternative to making multiple copies of the object I wanted to use for punching other objects. Rather than do that for nearly two dozen horizontal lines, I wanted to punch them all at once. The fact they are all the same color made things a little easier. If not, I’d have had to temporarily make them all the same color, then change them back afterward. After a bit of trial and error, I discovered that all the horizontal lines needed to become a compound path.
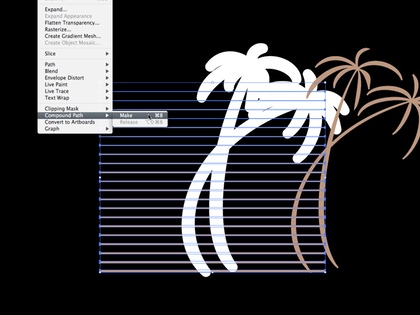
Converting the horizontal lines into a single, compound path.
There’s the secret. I selected Object ‣ Compound Path ‣ Make which causes Illustrator to treat all the selected objects as a single object.
The next step is to punch the palm tree object’s stroke mask out of the lines. Just as before, I selected the stroke object that was formerly the white palm outline, then select the horizontal lines with a single Shift-flick of any line, then head back to the Pathfinder palette to use the Minus Front command.

The shape of the palm tree mask has been successfully punched out of the horizontal lines.
Now, all that remains is to put everything back where I found it. After nudging the palm trees back into place with the Shift-Left arrow key, I mouse around to find the circular mask, click to select it, Shift-click one of the horizontal lines to select them as well, and then use the Object ‣ Clipping Mask ‣ Make command.

Reapplying the clipping mask.
At last, the task is complete. Please excuse the pathetic, hastily made sample background, but it will suffice. Here’s the logo, sans white stroke mask, with a gradient background showing through the gap.

The white stroke mask is now gone, and any background will now show through the gap between the horizontal lines and the palm tree.
Contact me with comments on this page if you have questions. I know the procedure seems rather convoluted, so I’m happy to try to help if you got lost.
I still miss FreeHand’s simplicity and always will, but I am finally beginning to gain a better appreciation of Illustrator’s capabilities, especially since I’m not sure this stroke-to-object procedure was possible at all in FreeHand.
![]() Copyright © 2010 Lee Bennett, lbennett@atpm.com.
Copyright © 2010 Lee Bennett, lbennett@atpm.com.
Also in This Series
- Give Alert Sounds a Little Personality · March 2012
- Create Your Own iPhone Ringtones · February 2012
- Create Your Own Homemade Audio Book · December 2011
- Upgrade to Lion Painlessly · August 2011
- Make the Most of TextEdit · July 2011
- Using the Free Disk Utility on Your Mac · May 2011
- Making Use of QuickTime X · March 2011
- Making the Most of What’s Already on Your Mac · February 2011
- Making the Most of What’s Already on Your Mac · January 2011
- Complete Archive
Reader Comments (12)
Thanks a million for this, Lee!
Add A Comment