Photoshop for the Curious
Don’t Yield—Merge!
Many of the consumer-level digital cameras these days are bundled with a shoddy excuse for software intended to help improve photos and do fun things with them. One feature, in particular, seems to be increasingly popular—merging (or stitching) photos into a panorama. Three different digital cameras I’ve used had this feature, only one of them had a Macintosh version, and it crashed pretty much every time I used it. The other two weren’t much better on a Windows box.
Never to worry again, because Photoshop has a splendid Photomerge function. Many Photoshop novices don’t realize it’s there because it’s tucked away in the File ‣ Automate menu. With neighboring menu functions like 3DxPhotoshop and Merge to HDR, those who take casual trips to the Automate menu might be scared away. But, it doesn’t take much bravery to use this powerful tool.
Preparing Photos For Merging
The key to great photo panoramas starts long before the photos ever find their way to Photoshop. The best panoramas come from photos that were taken with a panorama in mind. That means thinking about how the photos will stitch together before they are taken. There are four rules to follow:
- Avoid foreground objects as much as possible. The closer objects are to the camera, the more distorted and stretched they can become in the final panorama.
- Be sure the camera remains in the center point of rotation. This means the camera stays in one spot as the photographer swings around it. Putting the camera on a tripod takes care of this, by design. If the photographer remains stationary and simply turns in place, the camera swings wider around the center of rotation. Even just those few inches can make a difference if there are foreground objects such as the house that can be seen to the left side of my demonstration photo, below. Think of it this way—let the camera be at the spot where the hands of a clock connect in the middle as they turn, and not at the ends of the hands that point to the numbers.
- Leave enough room to overlap the photos. Some digital cameras have a mode that puts panorama guides in the viewfinder to help line up the multiple shots. If such a feature is not available, frame the picture so that 1/4 of one side in the first photo matches 1/4 of the opposite side in the next photo.
- Use manual exposure and white balance. A common error in panoramas I see is when the successive merged shots were on automatic exposure and/or white balance. The mismatched exposures and color shifts (most often visible in clear blue skies) can destroy an otherwise perfect panorama. When framing the panorama, decide which region is the primary subject. Manually set the white balance appropriate for the environment, then determine the exposure needed. It’s fine to take an auto-exposure reading for that spot, but then use that exposure as a manual setting for all the photos that will comprise the panorama.
Once the desired photos are captured, they’re ready for a trip through Photoshop’s Photomerge function.
Automatic Photomerge
Often enough, the results from a completely automatic Photomerge may be totally satisfactory. Let’s give it a try (note: I am using Photoshop CS3, which brought considerable enhancements to the Photomerge function in CS2):

My panorama will be made up of these four individual shots looking over the city of Ponce, Puerto Rico.
An automatic Photomerge is essentially a three-click process:
- Select File ‣ Automate ‣ Photomerge….
- Ensuring that automatic mode is enabled (it should be the default), click Add Open Files if the photos to be merged are already open, as mine are in the figure above. Alternatively (but with more clicks required), use the Browse button to select the directed photos to be merged.
- Click the OK button, sit back, and let Photoshop do its magic.

Result of the automatic Photomerge. The layer for one of the photos has been hidden to help visualize how Photoshop stitches the images together. (Click to enlarge.)
The result is not bad at all—just a trip to the Crop tool to eliminate the edges that were skewed to make the panorama fit, and this shot would be done.
Notice the Layers palette. Unlike the cheap merge utilities bundled with consumer cameras which arbitrarily find a single vertical spot to blend each photo together, Photoshop instead varies the position of the blend, finding the ideal spot to make the transition. The transition spot usually happens at areas of distinct contrast, such as the edge of a building, where the eye already expects a natural transition from building to background.
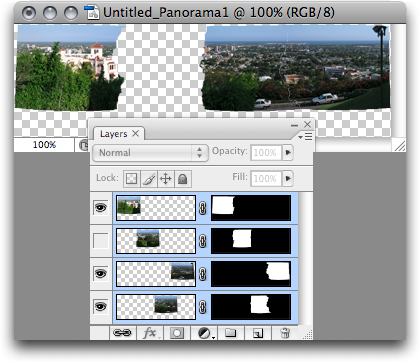
Note the use of Layer Masks as opposed to erasing parts of the image. If desired, experienced Photoshop users can manually fine-tune the image masks to improve the region where each image merges to the next.
Adding a Little Perspective
Even though this Photomerge produced very nice results, it could be better. The most significant issue I see is that the street is curving unnaturally in the lower right corner. The same perspective exaggeration is also in the lower left corner, but isn’t so obvious because that region is just foliage with no straight lines.
To attempt an improvement, instead of using the Automatic mode, I’ll try the Perspective mode, chosen in the Photomerge dialog box.

Result of the Perspective mode Photomerge. (Click to enlarge.)
Uh oh. What happened? Admittedly, the various Photomerge modes (all of which except the last one are technically automatic) will generally require a bit of trial and error. In this attempt, Photoshop managed to detect the road in the foreground and keep it essentially horizontal, but at the expense of badly distorting the left side of the photo. Nevertheless, the 3D-like wraparound curve is clearly visible as a result of the Perspective treatment.
To Do It Right, Sometimes You Have To Do It Yourself
To produce the best merge of this particular photo, I’ll require the services of the manual Interactive Layout mode. Once this mode is selected from the Photomerge dialog box, Photoshop begins the same process as before to begin merging the photos. But, instead of a finished merge, the Interactive Layout mode presents me with an interface to customize exactly how the images will fit together.
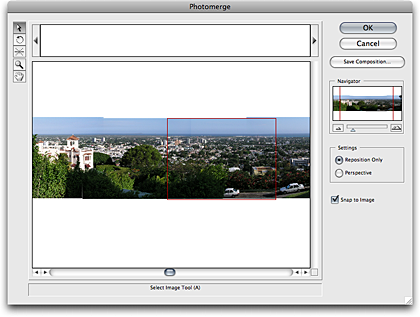
The Photomerge Interactive Layout interface attempts to closely position the photos into the region they should merge.
At first, Photoshop has only placed the images roughly where they will need to be without any kind of skewing to improve perspective. My next step is to click the Perspective mode on the right side of the Interactive Layout mode window.
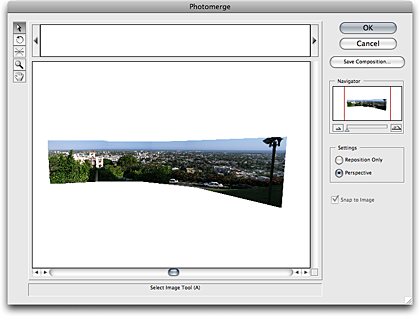
Certainly better than the automatic Perspective mode merge, but I’m not happy yet.
At this stage, Photoshop decided the “normal” perspective was more to the left, near the foreground building, instead of the street on the right. Fortunately, there’s a simple way to define which of the individual images should carry the normal perspective. I simply activate the third button in the upper left corner—the one that looks like a little starburst. That’s the Vanishing Point tool. Then, I click in the area of the third photo—the one where most of the street is visible—and accept the changes.

Result of the Interactive Layout mode. (Click to enlarge.)
I see now that the left side perspective isn’t nearly as wacky as the result from the automatic perspective merge. All that’s left to do is some cropping and color adjustment. Also, I admit, back when I took this photo, I violated rule number 4 to lock the exposure. Fortunately for this photo, it’s an easy to fix by swiping across those dark areas with the Dodge tool.

The finished photomerge. (Click to enlarge.)
Homework Assignment
Before taking the time to work in Interactive Layout mode, try the Cylindrical mode in the Photomerge dialog box to see if it provides better results. For photos that didn’t follow the initial composition rules very well, try using the Select Image tool in the Interactive Layout interface to slide each photo into a better position, and the Rotate Image tool if needed. Using these tools definitely requires hands-on experience, so open duplicate copies of the original photos and give these tools a try. Start with the Reposition Only button active and then switch to the Perspective button once the photos seem to be aligned as best as possible.
![]() Copyright © 2008 Lee Bennett, lbennett@atpm.com.
Copyright © 2008 Lee Bennett, lbennett@atpm.com.
Also in This Series
- File Format Fever · November 2008
- Don’t Reset—Preset! · October 2008
- Don’t Yield—Merge! · September 2008
- What If I Just Left It Alone? · August 2008
- Screen Replacements—When Reality Isn’t Real Enough · July 2008
- No Smoking Gun: Re-tooling Dodge and Burn · May 2008
- Mask-erades · February 2008
- Back in February · November 2007
- I Love Layers · October 2007
- Complete Archive
Reader Comments (2)
If any readers are interested in giving it a shot, it can be found at http://hugin.sourceforge.net/
Add A Comment