Software Review
Wings3D 0.98.34

This article is a continuation of a series on 3D computer graphics and animation for beginners. Like the previously reviewed Daz/Studio, Wings3D is donationware and open source. You may be wondering why I’m choosing lower-end, easy-to-learn programs that are also easy on your wallet. Well, I figure that if you’re seriously considering spending big money for a full-featured program (and they can run in the hundreds or thousands of dollars), then perhaps you should be browsing forums and Web sites specific to the community and software you’re considering. This little series is about enlightening people who may be interested in trying out 3D graphics, but do not have the resources or are uneasy with the jargon used in those sources.
Wings3D, or just Wings by most users, is a subdivision modeling and UV mapping program which highlights fast workflow for creating polygon meshes of virtual objects. If you already use a high-end 3D program, chances are you’ve heard of Wings because it has been an introduction to 3D modeling for many computer graphics designers and artists since 2001. In fact, it has been said that in the hands of a competent user, Wings can generate the same detailed model in a fraction of the time that it would take in a professional program like Maya or 3DS Max. While I certainly don’t consider myself among the ranks of professional 3D artists, Wings was my first modeling program and I still maintain the icon in my dock for when I need to whip up a simple item.
Thus, I’m convinced (as are many others judging by the activity on the Wings forums) that this program will appeal to those of you looking to get a start in 3D modeling, and will continue to be of use once you’ve found its limits and perhaps decided to move on. Even if you’re not interested in 3D graphics but want to keep your computer savvy kids busy and out of online trouble, install this simple program for them to explore. It is that easy to use. Also have them look at this inspirational gallery of images made with Wings, and you won’t want to miss this time-lapse series on the construction of a ghoul’s head.
Where to Go
The developers have a long history of providing Wings free to the Mac community from their Web site. Versions of the program are released regularly (four in 2006 alone!) and are categorized either as Developmental or Stable, with 0.98.36 being the latest release. It is often a good strategy to stay back from the bleeding edge when it comes to any new release, and Wings 0.98.36 is no exception, as it has been reported to consistently crash on MacBooks and at least one Intel iMac, and it crashes on my Mac Pro.
However, a rather large inventory of previous versions is maintained for download, with compatibility ranging from Mac OS X 10.2 right up to 10.4. A recompiled Universal Binary version of an earlier release, 0.98.34, can be downloaded from the MacWeb3D site, and runs well on my Mac Pro. That said, 0.98.34 has a buggy UV mapping unfolding algorithm, which has been corrected in subsequent releases, and it will not be compatible with any of the UV Mapping tutorials you review. I imagine this situation will be resolved in the next developmental release.
As already mentioned, there is a large and active online community of Wings users, with several Web sites and forums available to browse for tutorials and get solutions to your problems. While you may be tempted to lurk around at first, it is important to familiarize yourself with this friendly community as the developers do not offer support via e-mail. Just a few of the sites include the Wings3D official development forum, the Wings forum at the CG Society, and also at Renderosity to name only a few. You may have to register at some of the community sites.
The Official tutorial center has numerous tutorials, and PuzzledPaul has one of the best third-party sites going. Most of the subdivision modeling strategies and advice available at the Digital Sculpting Forum and in this Digital Sculpture Techniques article are not software specific, and can be implemented with any program.
The Wings Interface
Like most 3D modeling programs, Wings provides the user with a variety of primitive forms to start their creations, and most of these are seen in the image below. Anything can be created from these basic virtual building blocks; all you have to do is open the program, right-click the empty workspace area to get the primitives menu, and then make your selection.
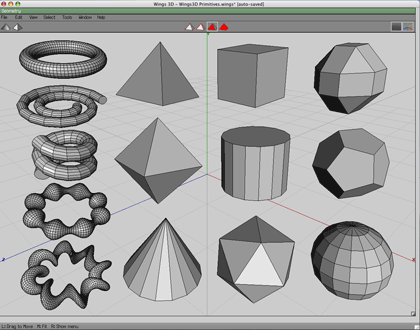
The available primitive forms to start modeling your creations in Wings3D.
This is probably a good time to discuss the mouse you will use. While Wings supports all varieties of mouse/button configurations (go to Edit ‣ Preferences), do yourself a favor, avoid the headaches, and get a three-button mouse since the manual and all the tutorials I’ve seen will assume you have one. As seen in the composite screen shot below, contextual menus drive the Wings user interface most of the time. One of the most helpful pieces of advice for the new user is to always keep an eye on the information line at the bottom of the screen, since it will tell you what the mouse buttons will do at any given moment.
In general, the left mouse button is used for click-selecting workspace elements, such as the object body, a face on the object, an edge between two faces, or a vertex (point) where edges meet. Once selected, elements turn a different color (red by default) and can be deselected by clicking on them again, or by pressing the Spacebar to clear all selections. The right mouse button is used to access contextual menus. The center mouse button/wheel is used to activate and quickly control the camera position anywhere around the object.
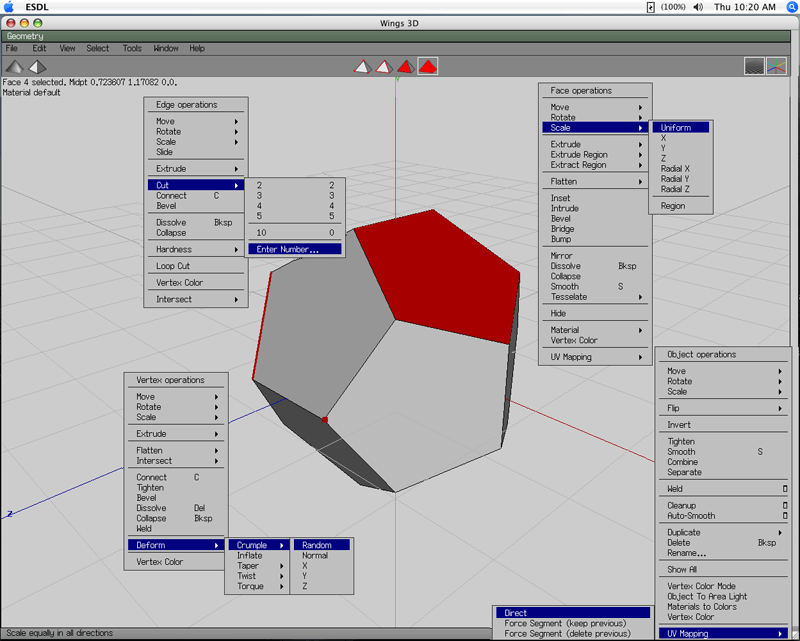
A composite screen shot of the contextual menus accessed through mouse click selection.
Don’t worry: your Wings workspace can never look like this screen shot with all of these pop-up menus because you can only be in one selection mode at a time. In order to cut down on the number of images for this article, yet display the flexibility of choices and tools that can be made with only two mouse clicks, I therefore compiled the four contextual pop-up menus in one figure (clockwise from bottom right: object, vertex, edge, face). You can only be in one selection mode at a time, yet can make as many selections within that element type as you want. The selection mode is determined by clicking on one of the four pyramids that you see just above the workspace center.
Once you’ve made an alteration to the object, such as in scale or position of the selection, you can either left-click on the empty workspace area to accept it, or right-click to undo. Once you get the hang of its simplicity, you just might find it as elegant as I do; however Wings’s workflow doesn’t appeal to everyone’s tastes.
The two pyramids you see at the top left of the workspace toggle between different visual modes: smooth shaded (sort of a render preview), and an orthogonal view that lacks perspective when you need to be accurate with the various dimensions of the object. The two icons at the top right toggle the workspace grid “floor” and the X, Y, Z axes on and off.
The menu bar at the top is composed of the usual choices: File, Edit, View, Select, Tools, Window, and of course Help. Many of the choices in these menus also appear in the contextual menus. A full and concise description of the rest of the Wings environment is located at this Wiki site.
Wings3D and UV Mapping
UV mapping of a 3D mesh allows you to cut your 3D model into connected 2D slices, called charts, which are laid out flat to facilitate the application of color and texture with any paint program to generate a texture map. Applying good texture maps can make or break the appearance of any rendered model. The UV Mapping/Segmentation mode of Wings is relatively powerful, and can automatically generate the cuts and chart layout for the UV map. Once again, the Wings tutorial center has good links to auto UV mapping tutorials, but you’ll have to dig around to find them.
While Wings can automatically generate a UV map, it also has the capability for you to do it by hand to avoid seams on certain parts of the model by hiding them in less conspicuous places. YCarry has some great introductory tutorials on both modeling and UV mapping common but challenging objects in Wings. However, many people decide to use specialty UV mapping software for their efficiency and flexibility to make and move charts. UV Mapper is a popular choice, which has both a shareware Classic version as well as a Pro version in Universal Binary.
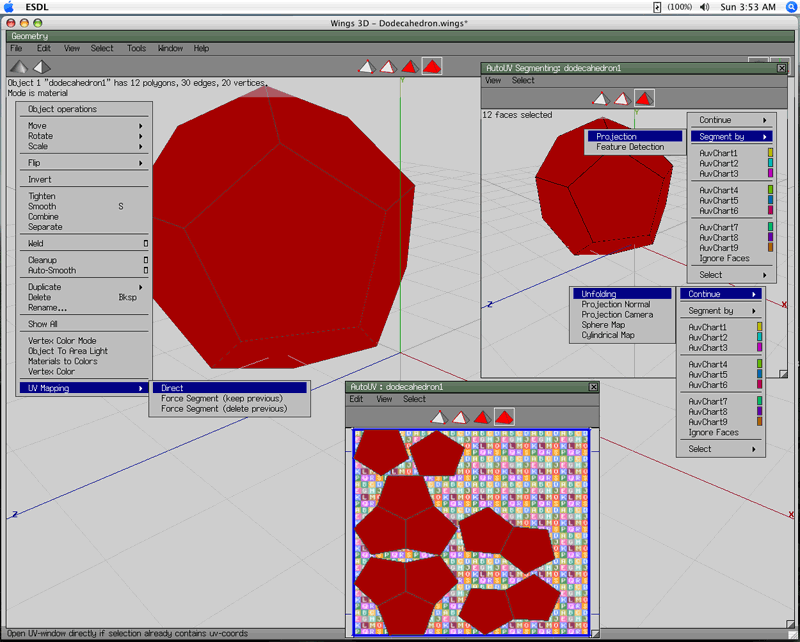
A compilation of steps and menus involved in the automatic UV mapping of an object in Wings.
This simple screen shot of the automatic UV mapping mode (AUV) is a compilation of three separate steps and their menus. In the upper left side of the workspace is the first step. The object to map is a simple dodecahedron, which is body selected, and the direct UV mapping mode is entered from the contextual menu. A separate UV mapping window will open (here resized and pushed to the upper right side) where you must again select the object(s) or face(s) to map by clicking surfaces or by dragging a bounding box around them, thus highlighting the selection in red.
Once the selection is made, chose the method to “Segment by” (direct, or by feature detection for more complex models), and then go to “Continue” to chose your method of projection depending on the characteristics of your model. A new window will open containing your UV map (resized at the bottom center in the screen shot), which will be saved as a separate but linked mtl file. If you export the model into another format—and you likely will need to—make sure they “travel” together in a folder.
Experiment with the different mapping choices to see how they slice and dice your model. With a simple object, such as the dodecahedron, there really isn’t any difference in the UV map produced and this example was only meant to illustrate the menus available. Your UV mapping choices and overall workflow will vary from model to model. More complex objects may require separate maps for the different materials, or cuts to avoid 2D mesh and subsequent texture distortion when rendered. Any image file can subsequently be used with the map.

Any digital image can be used as a texture map; here is a bunch of apples modeled and UV mapped in Wings3D, rendered in DAZ/Studio.
Drawbacks to Wings
Once you’ve completed modeling and UV mapping, it’s time to render your creation to an image file for distribution. Here you’ll run into a major but not insurmountable drawback to the program: Wings does not have any rendering capabilities. You must export your model from Wings to another rendering program like the shareware Daz/Studio, Art of Illusion, or POV-Ray. Fortunately a variety of popular export/import formats are available in Wings, such as 3ds, obj, and fbx, and each of these rendering programs has a Mac version available for free download. Wings supposedly has issues converting texture references between formats, but I have used obj format with Daz/Studio in the past and have had no problems.
Having to use multiple programs is not unusual in the industry. Many professionals maintain an entire arsenal of 3D modeling, animation, rendering, and other effects plugins and software, using each of them at different stages of production when their strengths are required. Some plug-ins for Wings have been created and are continuously improving or being incorporated into the core program, but like most things in this majority PC world, availability for the Mac can be an issue.
Wings Alternatives
The main shareware competitors to Wings are Art of Illusion and Blender. While both have their pros and cons, they can see a project through from initial conception, to UV mapping and final render, and even animation. Blender has been reviewed earlier in ATPM and has a reputation for being hard to learn, though the latest versions have more inclusive GUI menus. I don’t know much about Art of Illusion, but hope to check it out soon and report back. The Society of Digital Artists (or CGSociety) has put together a relatively comprehensive list of the various 3D programs comparing what they can and cannot do, though it appears to be a work in progress as some entries are incomplete. Check out this list and the features available, but don’t choke when you see some of the prices of the pro packages!
Conclusion
Out of necessity I have left out descriptions of the complex 3D manipulations that are available in Wings, such as edge loop, mirror, tweak, and the advanced menus, simply because there are so many of them and there is only so much space for this article. You are better off downloading the Wings PDF manual from the home page, as well as some of PuzzledPaul’s and YCarry’s excellent tutorials, in order to familiarize yourself with the actions, tools, and capabilities.
One thing to keep in mind is that there can be several ways to achieve the desired result in 3D modeling. For instance, a very simple example would involve making a rectangle; one could select one face on a cube and either move its position along the perpendicular axis, or instead use the extrude command on that face, or even select all four edges of the face and similarly shift their position along the axis. Some paths will involve fewer steps but the end result is the same. Working with Wings or any other 3D modeling program is very much like that, and until you get some modeling experience prepare to make mistakes and be less than efficient.
I was tempted to give Wings a “Very Nice” review based on its easy-to-learn merits, open source availability with good documentation, and a healthy online community of users who support newcomers. Since these are the types of people who are really attracted to Wings, it hits the target. That said, these users are only a sample of who might be willing to commit to learning a 3D program, such as students or soon-to-be students of computer graphics, and for those people I would say this software deserves a “Good” rating. This is based on the fact that you are faced with learning the ins-and-outs and potential interface issues between a number of smaller programs all at once, just to see a final rendered image.
Like any other program, you have to know what you want to do with it now, and ultimately where you hope to go, in order to determine whether the time investment to learn it is worth the effort. Wings certainly has one aspect in its favor though, since it is free, budget doesn’t factor into the equation! Download Wings in an appropriate version for your system, and just give it a try—you’ll soon be hooked.
![]() Copyright © 2007 Chris Dudar, PhD. Reviewing in ATPM is open to
anyone. If you’re interested, write to us at reviews@atpm.com.
Copyright © 2007 Chris Dudar, PhD. Reviewing in ATPM is open to
anyone. If you’re interested, write to us at reviews@atpm.com.
Reader Comments (3)
The UV mapping was pretty simple as well. The leaf had its own UV map cut along the edge and then I simply superimposed a leaf image onto the map in an image processor.
For the 3D apple I cut along the edge of the "bite" and mapped that separated, then cut along the back side of apple (away from view) to create a flat map and hide the resulting ugly texture seam (I didn't making seamless textures, though you can easily). The textures are any images you can find; I found pictures of tiger and leopard fur online and scaled appropriately by trial and error. Getting the right look with texture maps is fussy and can't be explained easily. You just have to be patient and persevere.
Russell Brown has a good tutorial [http://www.russellbrown.com/tips_tech.html] that shows how you can skin a 3D model right inside Adobe CS3 Extended. Just scroll down about half way in the list.
The chrome texture was a freebie I found on the web, somewhere, and in fact I also used it to create the chromed man on the June 2008 cover of ATPM [http://www.atpm.com/14.06/index.shtml]. There are numerous websites that offer free 3D textures, so happy hunting!
Add A Comment