FileMaking
Calculations in Depth
In the articles of this series up to now (which I highly recommend you read before continuing with this installment), we introduced the basic concepts of a relational database, walked through creating a simple database with FileMaker, and went over the field types that FileMaker provides. This month, we’ll investigate one of those field types in depth, the Calculation field. We’ll also cover the other areas of FileMaker that make use of calculations and touch on the Custom Function feature that is new with FileMaker 7.
Calculations in General
A primary function of databases is to store and retrieve information, but if that’s all databases did, they wouldn’t have nearly the utility they do. Databases also have the ability to take data input by a user and provide it in a different form. The computer doesn’t (usually) create anything new by doing this, but only takes the given input and produces the requested output.
For example, a sales database might allow the user to enter the lines items of an invoice. The user enters each line item, letting the computer know the quantity and unit price of each item. These two pieces of data (quantity and unit price) are provided by the user; the computer can’t know what they are. However, the computer can take the provide information and use calculations to provide the same information in a more useful form. First of all, the computer can multiply the unit price by the quantity to provide a line item total. The computer can then sum up all the line item totals of all the line items to provide an invoice total.
Note that the computer is not providing new information here. It is simply expressing the information provided by the user in a different form. Computers almost never create information (the single exception I can think of being random numbers, although even then the computer is working from information provided by the user, since the user provided the parameters of the random numbers).
What the computer has done is apply a calculation to existing data. In the case of the line item total, the calculation would be (in FileMaker’s syntax) Quantity*UnitPrice, and in the case of the invoice total, would be something like Sum(InvoiceLineItems::LineItemTotal).
FileMaker can make use of calculations in many places. We’ve already seen two of them in prior articles: in a Calculation field type and field validation. Other places FileMaker makes use of calculations are within some script steps, custom functions, and access privileges, among others. The concepts we will cover today can be applied to any of these places.
Anatomy of a Calculation
Calculations are built with four types of objects: fields, operators, constants, and functions. Our first example above, Quantity*UnitPrice, makes use of two fields and an operator (the asterisk, which signifies multiplication in FileMaker). The second example makes use of a function (Sum) and one field.
Every calculation also has a result type. Sometimes, you don’t have a choice as to what the result type will be. When we entered a calculation to validate a field, the result type had to be a boolean value (i.e., True or False). If you are using a script step to set a field value using a calculation, the result of the calculation should match the field type. However, when creating Calculation fields, you need to specify what type should be returned. In our two prior examples, our result type would have been Number.
FileMaker will ignore whitespace in calculations, which means that you can use spaces and carriage returns to make your calculation easier to read. Use this to your advantage! Calculations can get very complex, and therefore very hard to read. By indenting nested functions and providing spaces around operators you can ease the task of understanding your calculation later.
Another way to make calculations easier to read is to use comments. FileMaker allows two methods for indicating that the text of a calculation is a comment. The first is to use //, which says that everything that appears after those two characters is a comment. Such comments can only appear on a single line. The second is to begin with /* and end with */. Everything between those two codes will be considered a comment. Comments are completely ignored when FileMaker evaluates a calculation.
Let’s take a look at all of these options with an actual calculation that makes use of many of the concepts. Don’t worry too much about what this function does, although you should be able to deduce much of it. Just take a look at it so that we can take apart its syntax:
// Extracts the xth parameter from
// a list separated by pipes.
Let(
  // Bracket the entire parameter with
  // pipes for easier extraction.
  [ RefinedParameter =
        "|" &
        Get( ScriptParameter ) &
        "|" ];

  Case(
    // Make sure the x is legal.
    ( x ≤ 0 ) or
    ( x > ParameterCount(
            Get( ScriptParameter ) ) ) or
    ( Int( x ) ≠ x );
    "error";
    // Extract the parameter by getting
    // everything between the xth and
    // x+1th pipe.
    Middle(
      RefinedParameter;
      Position( RefinedParameter; "|"; 1; x )
        + 1;
      Position( RefinedParameter;
                "|"; 1; x + 1 ) -
        Position( RefinedParameter;
                  "|"; 1; x ) - 1
    )
  )
)
Most of the concepts I’ve described are found above. We have many operators (=, &, or, etc.), a number of functions (Let(), Case(), Middle()), a couple of comments that use the // format, parentheses to separate logical units of the calculation, and a number of constants (0, and "|").
Note the whitespace used to make this calculation easier to read. Without whitespace, the function would have looked like this:
Let([RefinedParameter="|"&Get(ScriptParameter
)&"|"];Case((x≤0)or(x>ParameterCount(Get(
ScriptParameter)))or(Int(x)≠x);"error";Middle
(RefinedParameter;Position(RefinedParameter;
"|";1;x)+1;Position(RefinedParameter;"|";1;x
+1)-Position(RefinedParameter;"|";1;x)-1)))
FileMaker considers both of the above versions to be the same, but obviously the first version is easier for humans to understand.
Operators
Operators are symbols that perform, of all things, an operation on two “operands.” For example, the calculation 1 + 3 is using the + operator on two operands, 1 and 3. FileMaker includes the standard arithmetic operators for addition (+), subtraction (-), multiplication (*) and division (/), which all work just as you would expect. Also available is the power operator (^), which raises the first operand to the power of the second, so that 3 ^ 4 will return 81.
FileMaker also includes comparison operators that compare one operand to another and return a boolean value of either True or False. FileMaker doesn’t actually have a separate boolean type. A boolean value is a value that can have only one of two possibilities: True or False. Rather than have a separate field type for boolean, FileMaker uses the Number field type, interpreting 0 as False and anything else as True. When FileMaker needs to return a boolean value, it will return 0 for False and 1 for True. FileMaker also includes two built-in constants, True and False, which are places holders for 1 and 0 and can sometimes increase the readability of your calculations.
Now that we know what boolean values are, we can return to our comparison operators. Comparison operators perform a comparison on their operands and return a boolean value. For example, 4 = 7 will return False, because four does not equal seven. 4 < 7 will return True because four is less than seven. FileMaker includes six comparison operators: equals (=), not equals (≠), greater than (>), less than (<), greater than or equals (≥), and less than or equals (≤).
In order to build complex boolean tests, FileMaker also provides us with four logical operators, and, or, xor, and not. The and operator uses two boolean values as its operands and returns True if both of them return True and False if either one is False. Therefore, ( 4 = (2 * 2) ) and ( ( 5 / 2 ) > 1) returns True because both of the operands are True.
The or operator returns True if either of the operands are true, and False if both of them are false. not reverses the boolean value of its operand, so that not True is False and vice versa.
The xor operator, also known as the exclusive-or operator is more seldom used, and will return True if either, but not both, of the operands is True. Therefore, a xor b is equivalent to (a or b) and (not (a and b)).
Finally, there is the concatenation operator, &, which will take two strings and return the concatenation of them. Strings are indicated by enclosing text within double-quotes. "File" & "Maker" returns "FileMaker".
All of the operators can by typed directly, but FileMaker also provides buttons and a list box for entering them. Clicking the button will insert the symbol on the button, while double-clicking a symbol or word in the list box will insert it from there.
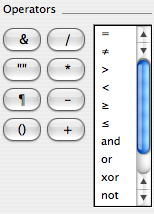
Each of the symbols can be entered from the keyboard, with the less common symbols available by using the Option key. To type a ≠ symbol, use Option-Equals. ≥ is input with Option-Period, and ≤ with Option-Comma. The one button you’ll see there that we haven’t covered is the paragraph mark, ¶. Use this when you wish to insert a carriage return into a string, as in FirstName & " " & LastName & "¶" & Address & "¶" & City & ", " & State & " " & ZipCode. This will return a string with two carriage returns. You can type the paragraph mark character by hitting Option-7 (which I remember because if you squint and use your imagination, the ampersand symbol on top of the 7 looks like of like the paragraph mark).
(Yes, FileMaker is cross-platform, and most of what I write in these columns is applicable to FileMaker on Windows XP, and yes, there are keyboard equivalents for these special characters, but they involve hitting the Alt key and then entering the character code for the symbol, which is, I think, four digits, and which I never remember, and that is yet another reason to use a Mac.)
FileMaker, like most programming languages, has an order of evaluation when parsing operators. For instance, multiplication and division will take place before addition and subtraction, so that 5 + 3 * 2 will return 11, not 16. I never rely on this precedence (as it’s called) for a number of reasons. First of all, I would have to memorize the order (does the > operator come before or after the and operator?). Second, anyone reading my calculations would have to know the precedence to be able to know what the calculation is supposed to do. Finally, parentheses override the order of precedence. To have the above sample return 16, the calculation would read ( 5 + 3 ) * 2, but even if I wanted the multiplication to be performed first, I would write it as 5 + ( 3 * 2 ), which makes the order explicit and easier to read.
The last thing to note about operators is that the subtraction operator (-) has an addition function: when used between two operands, it will subtract the second from the first, but when used before a single operand, it will return the negative of the operand, so that -x will return -5 when x is 5 and 3 when x is -3.
Functions
Functions are very much like operators in that they perform actions on other pieces of data. Rather than functions working with operands, however, they work with parameters. You pass some information to a function through parameters and the function returns a value based on the parameters.
FileMaker includes an extensive library of functions. A few don’t take any parameters, but most accept at least one. A simple function to use as an example is the Abs() function, which takes a single numeric parameter and returns the absolute value of the number. If you remember from your high school math, the absolute value of a number is its distance from zero. For zero and positive numbers, the absolute value of the number is the number itself. For negative numbers, the absolute value is the same number as a positive number. Abs( 5 ) returns 5 and Abs( -10 ) returns 10.
When multiple parameters are needed, each parameter is separated by a semi-colon. For instance, the Left() function takes two parameters, a string and a number. It returns the number of characters in the string that are indicated in the second parameter, starting from the left. An example of a call to it would be Left( "FileMaker, Inc."; 4 ), which would return the string "File". When entering the function in a calculation field, you can use commas instead of semi-colons, as in Left( "FileMaker, Inc.", 4 ), but FileMaker will convert this to the semi-colon syntax when you save the calculation.
Each function returns a value of a particular type. the Abs() function returns a number, while the Left() function returns a string. Some functions (such as If or Evaluate) can return any type.
Expounding on all of the functions included with FileMaker is beyond the scope of this series. My recommendation is to read the help files for every function FileMaker offers. Press Command-/ while in FileMaker to bring up the help system, click the “Contents” link in the top left and click the “Alphabetical list” link for the function reference (near the bottom of the help page). It will take a while to go over all of them, but I highly recommend it. You needn’t remember everything, but going over all of the available functions will allow you to become familiar with what is available so that when you need a function, you’ll remember that it exists and can use the help system to refresh your memory.
There are, however, a few functions that are more important to know because they will be used more often. We will cover some of these.
The first of these is the Case() function, which allows you to make decisions and provide different results based on a series of tests. Case() takes at least two parameters, but can, and usually will, take more. The parameters alternate between tests that return boolean values and expressions to use if the previous test evaluated to True. So tests and expressions come in pairs. If there is an extra parameter (i.e., an odd number of them), the last one is the default, which is what will be returned if none of the tests evaluate to True.
Here is the syntax of the Case() function:
Case( test1; result1 {; test2; result2; …}
      {defaultResult} )
When reading a syntax template like this, parameters found within curly braces ({}) are optional, the ellipsis indicates that there could be more parameters following. So the above says that the first two parameters are required. The second and third are optional, and set up the possibility of more parameters. The fifth parameter is also optional.
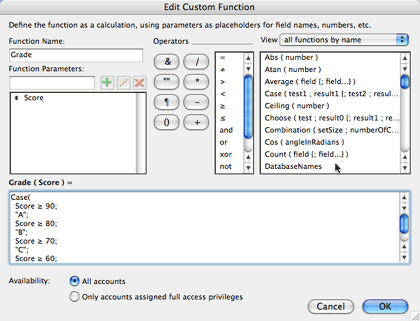
An example will help, and a common example with the Case() function is grades. Assume there is a number field in a database called Score that specifies the score out of 100 that a student received on a test. We could calculate the letter grade of the test with the following Case() function:
Case(
  Score ≥ 90;
  "A";
  ( Score < 90 ) and ( Score ≥ 80 );
  "B";
  ( Score < 80 ) and ( Score ≥ 70 );
  "C";
  ( Score < 70 ) and ( Score ≥ 60 );
  "D";
  "F"
)
Note the series of tests and results, with a default result being used if none of the tests evaluates to True. However, we can shorten this a bit because of a feature of the Case() function: As soon as it finds a test that evaluates to True it evaluates the expression following it and stops making tests. Here’s the shortened version:
Case(
  Score ≥ 90;
  "A";
  Score ≥ 80;
  "B";
  Score ≥ 70;
  "C";
  Score ≥ 60;
  "D";
  "F"
)
It’s possible for more than one of these tests to evaluate to True. For instance, if Score has a value of 86, the second, third, and fourth tests will also evaluate to True. But since once the second test returns True the Case() function will return the following expression and stop, we needn’t worry about ambiguity in the calculation.
The functionality of the Case() function is very similar to that of the If() function, and in fact, one can duplicate the results of the other. Here’s the syntax of the If() function:
If( test; resultOne; resultTwo )
Notice that if a call to Case() has only three parameters, it operates exactly like the If() function. If we wanted to duplicate the above Case() example with If(), it would look like this:
If(
  Score ≥ 90;
  "A";
  If(
    Score ≥ 80;
    "B";
    If(
      Score ≥ 70;
      "C";
      If(
        Score ≥ 60;
        "D";
        "F"
      )
    )
  )
)
Honestly, I haven’t used the If() function in years. I always use Case(). In previous versions of FileMaker, Case() executed faster than If(), which was important when performing long loops in scripts. I believe this is no longer the case, but I’ve gotten used to using only Case(), and doing so has the additional slight advantage that if I ever need to change a calculation to have more than one test, I don’t have to change the function I’m using. FileMaker doesn’t care. They will both work.
We’ve seen two ways to do the same thing here: using Case() and If(). FileMaker often provides multiple ways to do the same thing, and I’ll show you one more: Choose(). The Choose() function is less used than Case and performs a similar task, but in a slightly different way. Here’s the syntax:
Choose( test; result0
        {; result1; result2; …})
The Choose() function has only one test, and that test must return either zero or a positive integer. Based on the integer returned from the test, the corresponding result is returned from the function. A simple example would be:
Choose(
  3;
  "Zero";
  "One";
  "Two";
  "Three";
  "Four"
)
Because the “test” returns the number 3, the string "Three" (i.e., the fourth result) is returned. Choose() uses zero-based indexing, so that the first result is returned when the test returns 0, the second when it returns 1, and so on.
We would duplicate our grade calculation using Choose() as follows:
Choose(
  10 - Div( Score; 10);
  "A";
  "A";
  "B";
  "C";
  "D";
  "F";
  "F";
  "F";
  "F";
  "F";
  "F"
)
Here our test converts the Score to a value between 0 and 10. Div() returns the integer value of the first parameter divided by the second, so Div( 95, 10 ) will return 9 because 95/10=9.5 and Div() returns just the integer portion of that, the 9. It would be a good exercise for you to figure out, based on this information, why the calculation works, but it is functionally identical to our two previous examples. The point is that there are many ways in FileMaker to calculate the same result. By knowing all of the functions available to you, you can pick the best functions (or combination of functions) for your desired result. In this example, the Case() function would probably be best; it’s easy to read and understand and compact.
Custom Functions
We’ll cover more of the common functions next month, but there’s one more type of function that is useful: functions you create yourself. You’ll need FileMaker Developer 7 to follow along here, as it’s required to create custom functions. However, if someone has created custom functions in a database file, you can access them in your calculations even if you’re using FileMaker Pro.
Calculating the grade given a score would be a common need in an database used by a teacher. It would be handy to have this functionality as its own function, a Grade() function. If you have FileMaker Developer 7, you can do this, and after creating a custom function, you can access it in the file even when using FileMaker Pro 7. You provide a name for the custom function, the names of the parameters and the calculation to use.
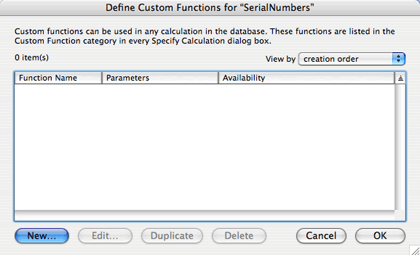
Open the SerialNumbers.fp7 file we’ve been working with in FileMaker Developer 7. Choose “File ‣ Define ‣ Custom Functions.”
Click the New button. Enter “Grade” in the “Function Name:” field. Type “Score” in the “Function Parameters:” field and click the plus button to its right. Finally, enter our example grade calculation that uses the Case() function into the large calculation text area at the bottom of the window.
Click the OK button to save your custom function, and click OK to dismiss the custom function list window. You can now use the Grade() function just like any built-in FileMaker function. You can test this by creating a new number field called “TestScore” and a calculation field with a number result called “TestGrade” and set its calculation to Grade( TestScore ). Place both fields on a layout and enter some grades into “TestGrade.” Custom functions are very useful, and probably one of the best new features of FileMaker 7.
That’s it for this month. Next month we’ll cover more of the most common functions in FileMaker. Until then, check out the FileMaker help files to gain familiarity with the functions available to you. As always, comments and questions are welcome.
![]() Copyright © 2005 Charles Ross, chuck@chivalrysoftware.com. Charles
Ross is a Certified FileMaker 7 Developer and the Chief Technology
Officer of Chivalry Software, LLC, a company specializing in
custom database, web and automation software and publisher of
Function Helper, a
FileMaker calculation debugging tool. He was a contributing writer
and the technical editor for The Book of FileMaker 6 and has
contributed to ISO FileMaker Magazine and Macworld in addition to his series on
AppleScript for ATPM.
Copyright © 2005 Charles Ross, chuck@chivalrysoftware.com. Charles
Ross is a Certified FileMaker 7 Developer and the Chief Technology
Officer of Chivalry Software, LLC, a company specializing in
custom database, web and automation software and publisher of
Function Helper, a
FileMaker calculation debugging tool. He was a contributing writer
and the technical editor for The Book of FileMaker 6 and has
contributed to ISO FileMaker Magazine and Macworld in addition to his series on
AppleScript for ATPM.
Also in This Series
- Incremental Progress · November 2008
- Getting Relational · April 2008
- FileMaker 9 · March 2008
- FileMaker 8.5 · September 2006
- Script Parameters and Results · July 2006
- “Real” Programming with FileMaker · June 2006
- Text Parsing With FileMaker · May 2006
- Welcome to FileMaker 8! · November 2005
- Common Functions · October 2005
- Complete Archive
Reader Comments (4)
I really appreciate the effort you are putting into this Series!
Gloria
I am somewhat new to FileMaker, and I read your article specifically to see whether you would address Operators that are not shown as standard Operators in FileMaker, but can be used in FileMaker. But your article did not address non-standard Operators, so I decided to send the following.
Recently I downloaded an audit tracking demo. When I checked out the calculation function, I noticed a couple Operators (at least I assumed that's what they are) that are not standard FileMaker Operators. I copied them from the Specify Calculation dialog box and inserted them below (they were in quotes in the function). Would you happen to know what they are and what they do?
"››" and "‡"
Thank you so much,
Lynne
I am two weeks new to FileMaker and using FileMaker Pro 7. I used your "Welcome to FileMaker" July 2005 article to get started. I found that I needed to add a step to the "Creating the Interface" Section which was to make the Field Format Pop-up List for the SerialNumbers layout to include the drop box for the ProductID field to show Product Names. It is kind of fun to see it do what I want.
But I am confused as to information on the Table View of the Publishers Layout. Under the field (or column) that shows Products::ProductName, I can see only one product per publisher even though I added several "products" to one publisher while building the database. I understand how to see these by adding the portal, but when trying to design my own database, I am confused about relations. I have searched through Google for info on relational databases without much luck towards my needs. I suppose I need something like Databases for Dummies. Could you suggest a site(s) or book that might be helpful?
I don't have the luxury of going to a school for this and am hoping you will continue to publish these great articles.
Thanks.
Al
The concept of relationships is a tricky one for beginners to FileMaker, and I apologize that I haven't explained them as well as you need. If you'd like to send me the file you're working on, I would be happy to take a look and see if I can figure out what the problem is.
As for outside resources, I can recommend a few good books. In the FileMaker world, Using FileMaker 7 is, I think, the best reference available, although it may not be good for beginners. It does go into depth regarding relationships, however, so I would see if there's a copy at your local book store and flip through that chapter to see if it would be helpful to you.
A book I found helpful a few years ago was Database Design for Mere Mortals. It isn't written for FileMaker, but does cover relational design for a beginner.
Chuck
Add A Comment