Review: Portraits & Prints Template Maker

Developer: Econ Technologies
Price: $9.95 (list)
Requirements: Mac OS X
Trial: Feature-limited (only four photo cells per template, only one print and save per session)
Last month, I looked at Portraits & Prints 1.0.1, an OS X-only application for creating prints from your digital photos. This month, I’m checking out Econ Technologies’ companion application, Portraits & Prints Template Maker.
Whereas Portraits & Prints only includes templates for printing out a collection of images in common photographic sizes, P&P Template Maker lets you create the templates used for printing your photos. And although the templates included with Portraits & Prints only include photographs, P&P Template Maker lets you use basic drawing and text tools for creating templates.
Laying It Out
When you create a new template, you are presented with a sheet that asks for a template name, a category, a creator, and a description. This information is used when the template is added to Portraits & Prints. Since the application now has a name for the template, it would make sense for this to be used as a suggestion for the file name, à la Photoshop. However, this is not the case—new files are still named “Untitled.”
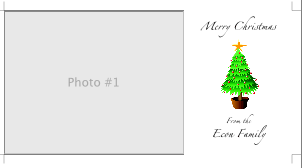
Photo cells act as placeholders for images in Portraits & Prints. You can place as many as you want on a template and have them be any size that you want. The only restriction is that they be rectangular. On the surface, this may seem like a small restriction; why would you want to print out non-rectangular images? However, if you decide to make more advanced templates, you might feel constrained by this limitation. You can’t, for instance, put an oval photo cell inside of a rectangular frame drawn with the image editing tools. Also, you can’t have a photo cell that feathers the edge of an image—such an effect might be nice on the holiday card templates available on the Portraits & Prints Template Exchange.
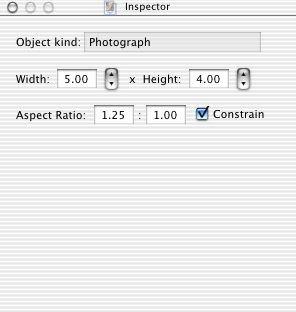
The inspector panel for a photo cell.
P&P Template Maker provides an Inspector panel for getting information about each object in a template. For photo cells, you can view and edit the cell’s dimensions and aspect ratio. If you find an aspect ratio that you like but are still not happy with the cell’s size, there is a Constrain option. When constraining the aspect ratio, the resize behavior becomes erratic. The resize handle in the middle of the cell’s bottom does nothing. The resize handle in the middle of the cell’s top moves the cell without resizing. Finally, the four corner resize handles both resize the cell and move it vertically along the page.
As for the basic drawing tools, P&P Template Maker provides a line tool, a rectangle tool, and an oval tool. On the surface, these tools behave like you would expect. However, they have some shortcomings that become apparent with use.
First, there is no way to make a tool selection permanent. After you finish drawing a square, the program reverts to the selection tool. This isn’t entirely uncommon; I’ve seen other programs that do this. Most of these programs, though, allow the user to specify that he wants to keep the drawing tool active—double-clicking or clicking with a modifier are two common examples.
Second, shift-dragging does not work. In many programs, shift-dragging will constrain a rectangle to a square, an oval to a circle, or a line to 45° angles. P&P Template maker just ignores the Shift key.
Third, shift-resizing also does not work. Often, shift-resizing is used to constrain the aspect ratio of an image. When you shift-resize in P&P Template Maker, the object is deselected, but still resizes.
The latter problem could be somewhat rectified if the Inspector panel for shapes had a Constrain option, like the photo cell. For rectangles and ovals, you can only modify the line width, line color, and the fill color. For lines, you can only modify the line width and color.
The text tool has slightly more options than the drawing tools, but it too, has shortcomings. When you want to add text, draw a text box to the size you think you will need. You can later resize the text box if you guessed wrong. For the text tool, you can select any font and size you would like. You are limited to one font face and size per text box, so creating something like the ATPM logo as a text object would be fairly difficult—you would need to align three separate text boxes. At the most, you have three options for text styles: bold, underline, and italic. The exact options are dictated by the font face—if a font does not support a style, the option is grayed out. The text can be centered, aligned left, aligned right, or justified.
You can also select a foreground and background color for the text. In the Inspector panel, there is a permanently grayed out and selected checkbox next to the Foreground field. This is used to indicate that the foreground color is always on, but I think that it is misplaced, since it could make the user believe that there was some way to make the foreground transparent. It wasn’t until I looked at the help that I found out the checkbox was only a hint to the user. That’s too bad, because you could come up with some interesting effects by having some sort of background showing through where the letter would have been.
Finally, you can allow users to edit the text inside of Portraits & Prints. To do this, you give the text field both a name and an identifier. Since text fields in Portraits & Prints are edited in a sheet, the name is used to indicate which field is being edited. The identifier field is used so Portraits & Prints can remember which text is associated with which field when the catalog is closed and opened. For some reason, the identifier field is optional while the name field is not. Personally, I think that you should at least be warned as to the consequence of not inputting an identifier.
If you want to create templates that have more complex objects than you could make with P&P Template Maker’s basic drawing tools, you are in luck—the application also lets you use clip art. There are four ways to add clip art to a template. The first three are the usual suspects: importing a file, drag-and-drop, and pasting from the clipboard. The fourth option is using Services. By default, the only service included with OS X that is usable with P&P Template Maker is Grab (which takes screenshots). You may extend the functionality of the application by adding additional graphics services.
The Inspector panel for clip art objects lets you change the image’s size by entering values for the height and width or using a percentage of the original height and width. Like the Inspector panel for the drawing tools, there is no Constrain option. Likewise, shift-resizing is broken for a clip art object.
Falling Short
As a companion to Portraits & Prints, P&P Template Maker makes an already useful application even more attractive. As an OS X application, though, it fails to impress. The problems with the drawing tools make learning the application difficult for those coming from more standard Macintosh drawing tools. Since you are limited to rectangular photo cells, your freedom in creating templates and extending Portraits & Prints is limited. Additionally, P&P Template Maker fails to use any of the advanced image effects provided by OS X’s Quartz layer. There are no automatically calculated drop shadows, the text effects are limited, and there are no transparency or watermark options. If you own Portraits & Prints and are getting tired of the included templates, P&P Template Maker might be worth considering at $9.95. However, it’s obvious that work could still be done to make this a more compelling add-on.
![]() Copyright © 2002 Eric Blair,
eblair@atpm.com. Reviewing in ATPM is open to anyone. If you’re interested, write to us at reviews@atpm.com.
Copyright © 2002 Eric Blair,
eblair@atpm.com. Reviewing in ATPM is open to anyone. If you’re interested, write to us at reviews@atpm.com.
Reader Comments (0)
Add A Comment